This tutorial describes the design and development of an inventory system for a dungeon crawler game. An object-oriented paradigm is employed, with a UML class diagram created using the draw.io tool, used to identify the main objects and their relationships. This class diagram will be used as a framework for the development of code.
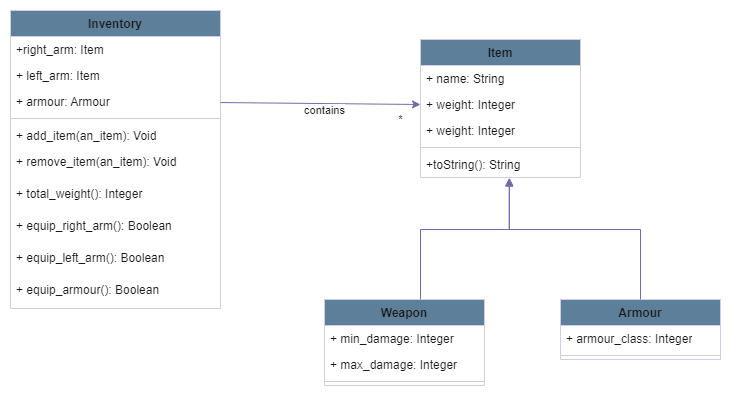
For this initial iteration of the inventory design, the design consists of four classes. All item objects (represented by the Item class) include name and weight attributes. Two specialisations of the Item class are defined using inheritance. The first of these is the Weapon subclass which adds two additional attributes representing the minimum and maximum amounts of damage done by the weapon. The Armour subclass has one additional attribute that is used to represent the level of protection provided by the armour.
The Inventory class is used to keep track of all items carried by a player character. The directed link from the Inventory class to the Item class indicates that each inventory contains 0 to many items. Attributes in the class are used to represent items that are currently equipped (in use) by the player character. Methods are included that enable items to be added and removed from the inventory. The total_weight method calculates the combined weight of all items in the inventory – this can be used to determine whether a character is encumbered. The last three methods shown are used to equip items.
Item class
The Item class contains an initialiser method for creating new instances. The name of the item and its weight is passed as arguments to the initialiser method, these are then used to set the name and weight attributes. A third attribute, bonus, is used to represent a (typically magical) bonus that improves the capabilites of the item (e.g. a weapon would deal more damage, while armour would provide more protection).
As shown in the class diagram, two subclasses of the Item class are created. Subclasses inherit the attributes and methods of its parent class, but may include additional attributes and/or method, or may indeed override (re-implement) methods of the parent class. In our example the Armour and Weapon subclasses are introduced. They both have additional attributes that make the subclass as specialisation of its parent. Armour includes an additional attribute, armour_class, which models the amount of protection that the armour provides. The Weapon class includes attributes representing the minimum and maximum amount of raw damage done by the weapon.
Both of the subclasses override the initialiser method of the parent class. The initialiser method for the Armour class includes an additional argument, ac, used to the armour_class attribute. The initialiser of the subclasses also calls the initialiser method the parent class using the super method, as shown on lines 10 and 16 of the code listing below.
class Item:
    def __init__(self, name, weight):
        self.name = name
        self.weight = weight
        self.bonus = 0

class Armour(Item):
    def __init__(self, name, weight, ac):
        super().__init__(name, weight)
        self.armour_class = ac

class Weapon(Item):
    def __init__(self, name, weight, min_damage, max_damage):
        super().__init__(name, weight)
        self.min_damage = min_damage
        self.max_damage = max_damage
Inventory class
The Inventory class keeps track of the items a player character has in their possession. The collection of items is stored in a list, which is initially empty. Additional attributes are used to model the items that are currently equipped by the player character. For this initial design, items held in the right and left hands, together with any armour worn are modelled.
A method for adding items to the inventory is defined next, followed by a method that is called to remove an item from the inventory. For the latter method a check is done to ensure that the item is in the inventory before it is dropped.
class Inventory:
    def __init__(self):
        self.contents = []
        self.right_arm = None
        self.left_arm = None
        self.armour = None

    def add_item(self, item):
        self.contents.append(item)

    def drop_item(self, item):
        if item in self.contents:
            self.contents.remove(item)
The following method calculates the total weight of the items in the inventory. This is done using a list comprehension to collect all of the weights into a list. The sum function is then applied to this to find the total weight.
    def total_weight(self):
        return sum([i.weight for i in self.contents])
The following method is used to equip a weapon in the right hand of the player character. A check if done to ensure that the item is in the inventory contents and that the item is a weapon. The method returns a Boolean-valued result indicating whether or not the method was successful.
    def equip_right_arm(self, item):
        if item in self.contents and type(item).__name__ == "Weapon":
            self.right_arm = item
            return True
        else:
            return False
The following method creates a string representation of the inventory. The equipped items are shown first, using an inline if statement to check whether or not the equipment slots contain an item. A for loop is then used to represent the complete contents of the inventory.
    def __str__(self):
        result = "Equipped items\n"
        result += "---------------\n"
        result += "Right Arm ::" + (self.right_arm.name if self.right_arm else "empty") + "\n"
        result += "Left Arm ::" + (self.left_arm.name if self.left_arm else "empty") + "\n"
        result += "Armour ::" + (self.armour.name if self.armour else "empty") + "\n"
        result += "\nOther items\n"
        result += "---------------\n"
        for i in self.contents:
            result += i.name + "\n"
        return result
Driver Code
The driver code shown below is used to test the correctness of the previous code. Instances of armour and weapon classes are created. A new inventory object is created with the item instances added to this inventory. The contents of the inventory is then printed using the string representation method which is called implicitly when the inventory object is passed as the print argument. Further tests are done to check the correctness of the other methods from the inventory class.
from item import *
from inventory import *

armour1 = Armour("Plate Armour", 120, 18)
armour2 = Armour("Leather Armour", 20, 12)

weapon1 = Weapon("Longsword", 15, 1, 8)
weapon2 = Weapon("Axe", 8, 1, 6)

# create new inventory and add items
inventory = Inventory()

inventory.add_item(armour1)
inventory.add_item(armour2)
inventory.add_item(weapon1)
inventory.add_item(weapon2)

print(inventory)

# remove item from inventory

inventory.drop_item(armour2)
print(inventory)

# check the total weight of the inventory
print(inventory.total_weight())

# equip a weapon with right arm
inventory.equip_right_arm(weapon1)
print(inventory)

# try equipping right arm with armour
inventory.equip_right_arm(armour1)

print(inventory)