Inventory system design and development

This tutorial describes the design and development of an inventory system for a dungeon crawler game. An object-oriented paradigm is employed, with a UML class diagram created using the draw.io tool, used to identify the main objects and their relationships. This class diagram will be used as a framework for the development of code.

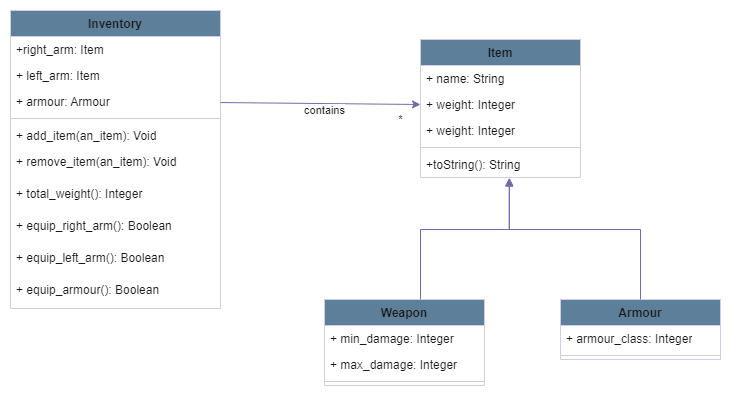
For this initial iteration of the inventory design, the design consists of four classes. All item objects (represented by the Item class) include name and weight attributes. Two specialisations of the Item class are defined using inheritance. The first of these is the Weapon subclass which adds two additional attributes representing the minimum and maximum amounts of damage done by the weapon. The Armour subclass has one additional attribute that is used to represent the level of protection provided by the armour.

The Inventory class is used to keep track of all items carried by a player character. The directed link from the Inventory class to the Item class indicates that each inventory contains 0 to many items. Attributes in the class are used to represent items that are currently equipped (in use) by the player character. Methods are included that enable items to be added and removed from the inventory. The total_weight method calculates the combined weight of all items in the inventory – this can be used to determine whether a character is encumbered. The last three methods shown are used to equip items.

Item class

The Item class contains an initialiser method for creating new instances. The name of the item and its weight is passed as arguments to the initialiser method, these are then used to set the name and weight attributes. A third attribute, bonus, is used to represent a (typically magical) bonus that improves the capabilites of the item (e.g. a weapon would deal more damage, while armour would provide more protection).

As shown in the class diagram, two subclasses of the Item class are created. Subclasses inherit the attributes and methods of its parent class, but may include additional attributes and/or method, or may indeed override (re-implement) methods of the parent class. In our example the Armour and Weapon subclasses are introduced. They both have additional attributes that make the subclass as specialisation of its parent. Armour includes an additional attribute, armour_class, which models the amount of protection that the armour provides. The Weapon class includes attributes representing the minimum and maximum amount of raw damage done by the weapon.

Both of the subclasses override the initialiser method of the parent class. The initialiser method for the Armour class includes an additional argument, ac, used to the armour_class attribute. The initialiser of the subclasses also calls the initialiser method the parent class using the super method, as shown on lines 10 and 16 of the code listing below.

class Item:
    def __init__(self, name, weight):
        self.name = name
        self.weight = weight
        self.bonus = 0

class Armour(Item):
    def __init__(self, name, weight, ac):
        super().__init__(name, weight)
        self.armour_class = ac

class Weapon(Item):
    def __init__(self, name, weight, min_damage, max_damage):
        super().__init__(name, weight)
        self.min_damage = min_damage
        self.max_damage = max_damage

Inventory class

The Inventory class keeps track of the items a player character has in their possession. The collection of items is stored in a list, which is initially empty. Additional attributes are used to model the items that are currently equipped by the player character. For this initial design, items held in the right and left hands, together with any armour worn are modelled.

A method for adding items to the inventory is defined next, followed by a method that is called to remove an item from the inventory. For the latter method a check is done to ensure that the item is in the inventory before it is dropped.

class Inventory:
    def __init__(self):
        self.contents = []
        self.right_arm = None
        self.left_arm = None
        self.armour = None

    def add_item(self, item):
        self.contents.append(item)

    def drop_item(self, item):
        if item in self.contents:
            self.contents.remove(item)

The following method calculates the total weight of the items in the inventory. This is done using a list comprehension to collect all of the weights into a list. The sum function is then applied to this to find the total weight.

    def total_weight(self):
        return sum([i.weight for i in self.contents])

The following method is used to equip a weapon in the right hand of the player character. A check if done to ensure that the item is in the inventory contents and that the item is a weapon. The method returns a Boolean-valued result indicating whether or not the method was successful.

    def equip_right_arm(self, item):
        if item in self.contents and type(item).__name__ == "Weapon":
            self.right_arm = item
            return True
        else:
            return False

The following method creates a string representation of the inventory. The equipped items are shown first, using an inline if statement to check whether or not the equipment slots contain an item. A for loop is then used to represent the complete contents of the inventory.

    def __str__(self):
        result = "Equipped items\n"
        result += "---------------\n"
        result += "Right Arm ::" + (self.right_arm.name if self.right_arm else "empty") + "\n"
        result += "Left Arm ::" + (self.left_arm.name if self.left_arm else "empty") + "\n"
        result += "Armour ::" + (self.armour.name if self.armour else "empty") + "\n"
        result += "\nOther items\n"
        result += "---------------\n"
        for i in self.contents:
            result += i.name + "\n"
        return result

Driver Code

The driver code shown below is used to test the correctness of the previous code. Instances of armour and weapon classes are created. A new inventory object is created with the item instances added to this inventory. The contents of the inventory is then printed using the string representation method which is called implicitly when the inventory object is passed as the print argument. Further tests are done to check the correctness of the other methods from the inventory class.

from item import *
from inventory import *

armour1 = Armour("Plate Armour", 120, 18)
armour2 = Armour("Leather Armour", 20, 12)

weapon1 = Weapon("Longsword", 15, 1, 8)
weapon2 = Weapon("Axe", 8, 1, 6)

# create new inventory and add items
inventory = Inventory()

inventory.add_item(armour1)
inventory.add_item(armour2)
inventory.add_item(weapon1)
inventory.add_item(weapon2)

print(inventory)

# remove item from inventory

inventory.drop_item(armour2)
print(inventory)

# check the total weight of the inventory
print(inventory.total_weight())

# equip a weapon with right arm
inventory.equip_right_arm(weapon1)
print(inventory)

# try equipping right arm with armour
inventory.equip_right_arm(armour1)

print(inventory)

Installing Python packages behind a firewall

The following guide shows how to install python packages behind a firewall using the trusted-host option with the pip command.
This is typically needed when a ConnectTimeoutError is received when you are attempting to install python packages.

Option 1: Adding an option to the pip command in the shell

The first option involves adding a trusted-host option each time pip is called in the shell.

pip install <package-name> pip --trusted-host pypi.org --trusted-host files.pythonhosted.org

Option 2: Adding configuration option in Pycharm

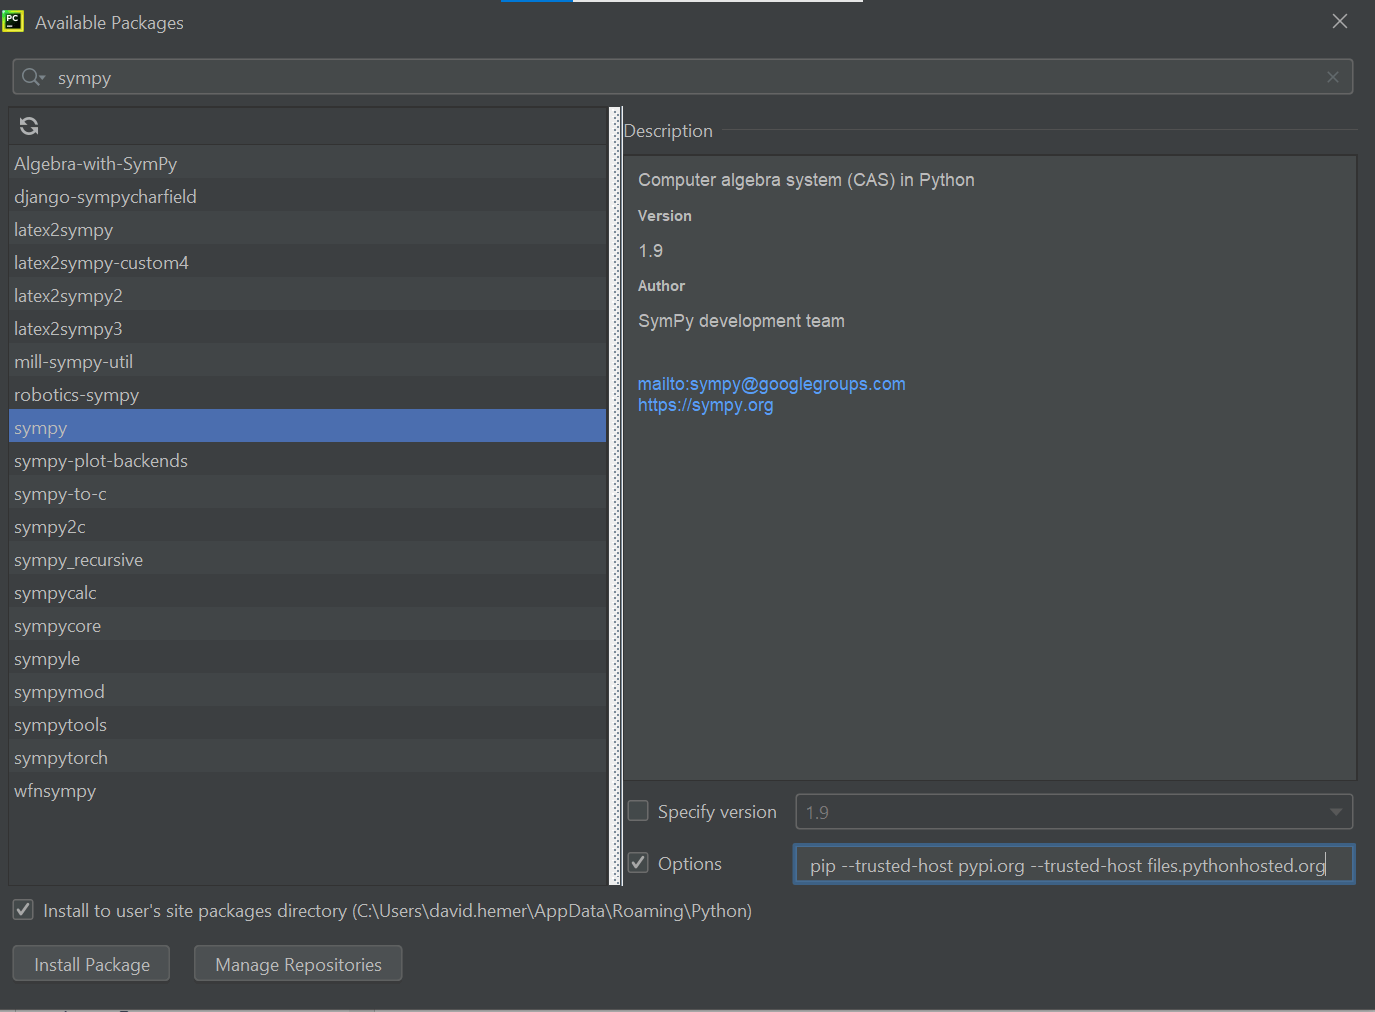
If you are installing packages from the Pycharm IDE, you can set the trusted host(s) within the Option field.

Pip trusted-host option in Pycharm
The following command is added to the Option field

pip --trusted-host pypi.org --trusted-host files.pythonhosted.org

Option 3: One-off configuration in the shell

The third option is the best to use for a long-term solution. In this case a trusted hosts are set within a configuration file which is checked whenever pip is called (either in the shell or in Pycharm).

pip config set global.trusted-host "pypi.org files.pythonhosted.org"

A screenshot of the pip config command being called is shown below.
Command for configuring pip in Powershell

The contents of the pip configuration file after the command is called is shown below, viewed using the Notepad++ editor.

Pip configuration file

GUI Development Basics in Python

In this tutorial we present the development of a GUI-based application in Python using tkinter. A variety of widgets are covered including: labels, entries, buttons, spinboxes, combo boxes, radio buttons, check buttons, scale and calendars. The focus for this tutorial is on constructing the view layer (how the application appears) with minimal development of the underlying logic.

Application Design

Before we write any code we need to design the layout for our application.
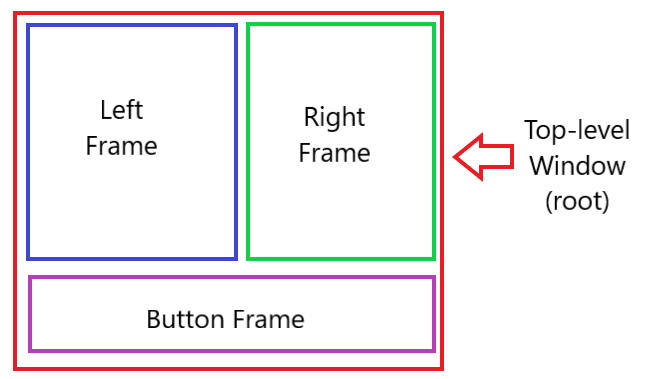
For this example we will divide our application into three main parts. The left frame will contain the entry (input) components of our application. The right frame will include additional configuration components in the form of radio buttons and checkbuttons.
The button frame will contain command buttons. An overview of the layout is shown below.
Step 1: The top-level window

We begin by creating the top-level window (root) for the application. Lines 1 and 2 of the code import the tkinter package, that contains all of the basic interface widgets, together with the ttk extension package, which includes enhanced and additional widgets.
The main control window of the application is created on line 5 of the code. The last line of the code (line 17) initialises the control loop for the GUI application – this line should always occur at the end of the code listing.

Lines 7-15 create frames for the three main parts of the application interface as explained above. To ensure that the button frame spans all of the application window we use the columnspan option.

from tkinter import *
from tkinter.ttk import *

# create the main application window
root = Tk()

# create a frame for a variety of entry and scale widgets
left_frame = Frame(root)
left_frame.grid(row=0, column=0)

right_frame = Frame(root)
right_frame.grid(row=0, column=1)

button_frame = Frame(root)
button_frame.grid(row=1, column=0, columnspan=2)

root.mainloop()

Step 2: Labels and Entries

In the next step we add two pairs of labels and entry widgets that will allow the user to enter their first name and last name.
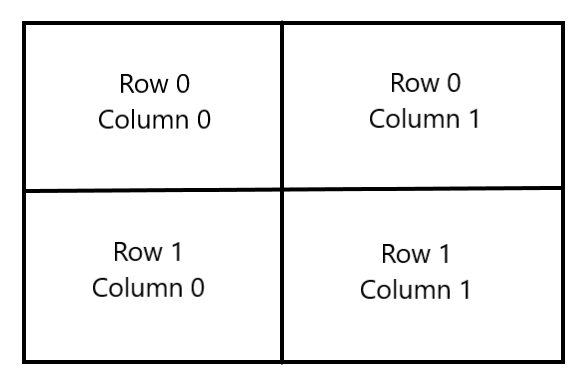
These widgets are packed using the grid packing system within the left frame as shown in the diagram below. The grid consists of two rows and two columns, with the numbering starting at 0 for both the row and column.
Labels are added to the application using the Label widget as seen in line 2 below. The font command is used to change the appearance of the text, using a size larger than the default and representing the text using boldface. The Entry widget is used to get input from the user, in this case to get their first and last names. Both of the Entry widgets are associated with a text variable. When text is entered in the entry box the value of the text variable is updated automatically. Both of the text variables are mapped string variables.

The following code is added to the previous code after the creation of the left, right and button frames and before the final line of code.

# label and entry widgets used to enter information. Values linked to string variable.
first_name_label = Label(left_frame, text="First Name", font=("-size", 15, "-weight", "bold"))
first_name_label.grid(row=0, column=0, padx=5, pady=5)
first_name = StringVar()
first_name_entry = Entry(left_frame, textvariable=first_name)
first_name_entry.grid(row=0, column=1, padx=5, pady=(0, 10), sticky=tkinter.E)

last_name_label = Label(left_frame, text="Last Name", font=("-size", 15, "-weight", "bold"))
last_name_label.grid(row=1, column=0, ipady=5)
last_name = StringVar()
last_name_entry = Entry(left_frame, textvariable=last_name)
last_name_entry.grid(row=1, column=1, padx=5, pady=(0, 10), sticky=tkinter.E)

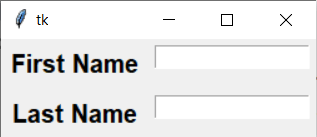
The resulting GUI after this code is run is shown below.
Step 3: Adding a command button

In this step we add a command button that will display the details that the user has entered using a message box.
The button is created using a Button widget. This is placed in the button frame that appears at the bottom of the screen. The Button widget command takes two parameters in this case. The first, text, sets the text that will be displayed in the button. The second, command, configures the function that will be called when the button is pressed.

print_button = Button(button_frame, text="Print details", command=print_details)
print_button.grid(row=0, column=0, padx=5, pady=10)

When the button is pressed a message box will be displayed showing the first and last name that has been entered in the two Entry boxes. To create a messagebox object an additional import command must be added to the top of the code file (just below the existing import commands).

The function print_details is defined which will be called when the button is pressed. The function prints the first and last names to the terminal output – this line of code is used for code development and debugging purposes and could be removed from the final version. Line 5 of the code below creates a new messagebox which will print the user’s first and last names in a pop-up window.

from tkinter import messagebox

def print_details():
    print(first_name.get(), last_name.get())
    messagebox.showinfo("Details", "hello " + str(first_name.get()) + " " + str(last_name.get()))

Step 4: Adding a spinbox

The next step involves adding a spinbox entry, which will allow users to enter a numeric value (their age) from a fixed selection of values. The spinbox entry is linked to an integer-valued variable by the textvariable option. Two further options also specify the minimum and maximum values that can be selected from. Note the use of an underscore at the from_ option – this is avoid a name class with the builtin from keyword.

age_label = Label(left_frame, text="Age", justify="center", font=("-size", 15, "-weight", "bold"))
age_label.grid(row=2, column=0, ipady=5)
age = IntVar()
age_entry = Spinbox(left_frame, textvariable=age, from_=0, to=100)
age_entry.grid(row=2, column=1, padx=5, pady=(0, 10), sticky=tkinter.E)

A screenshot of the resulting spin box is shown below.

Step 5: Adding a Combo box

Step 5 involves adding a Combo box to the application, which allows the user to select from a predefined list of choices. In this case the Combo box provides a list of colours that the user can choose from to pick their favourite colour.
The Combobox widget is linked to the colour string variable using the textvariable option. The values option links to the list used to store the available colours.

colour_label = Label(left_frame, text="Favourite Colour", justify="right", font=("-size", 15, "-weight", "bold"))
colour_label.grid(row=3, column=0, ipady=5)
colour = StringVar()
colour_list = [
    'green',
    'blue',
    'red',
    'yellow',
    'orange',
    'purple',
    'pink'
]
colour_entry = Combobox(left_frame, textvariable=colour, values=colour_list)
colour_entry.grid(row=3, column=1, padx=5, pady=(0, 10), sticky=tkinter.E)

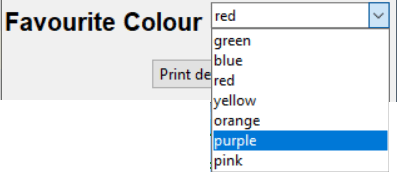
The screenshot below shows the combo box being used to select the user’s favourite colour. When clicked on, a menu drops down from the entry boxv allowing the user to select from the available colours.
Step 6: Date entry

The DateEntry widget is used in this step to enter the user’s birthday. To access the DateEntry widget – together with its associated calendar widget, we need to import the tkcalendar package. This import code should be placed near the top of the file after the other import commands.

from tkcalendar import Calendar, DateEntry

The locale argument is configured so that the dates are displayed using Australian date formatting (en_AU). The year argument is used to set the year that the DateEntry will start at when it is first opened. Similar arguments are included for setting the initial day and the month. The date_pattern argument is used to specify the format that the dates will be displayed in. In this case the day and month will both be displayed using two digits, while the year will be displayed using four digits.

dob_label = Label(left_frame, text="Date of birth", justify="right", font=("-size", 15, "-weight", "bold"))
dob_label.grid(row=4, column=0)
dob_entry = DateEntry(left_frame, width=12, locale="en_AU", background='darkblue', foreground='white', borderwidth=2, year=2000, month=1, day=1, date_pattern = 'dd/mm/y')
dob_entry.grid(row=4, column=1, padx=5, sticky=tkinter.E)

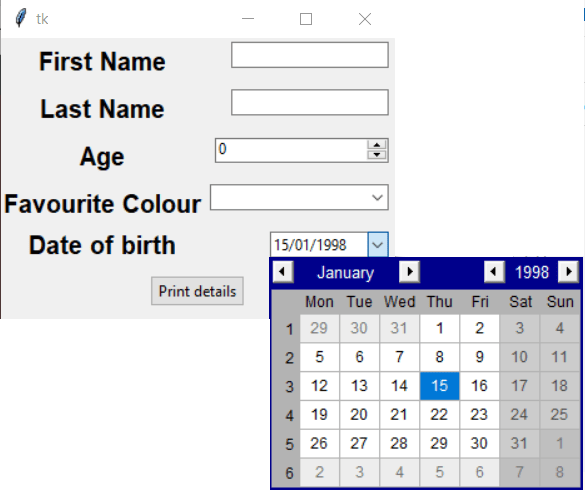
The resulting date entry box is shown below.
Step 7: Using a scale widget

For step 7 we use a scale widget to introduce a slider that can be used to select a test score between 0 and 100. Like the Spinbox widget, the Scale widget includes options for setting the minimum and maximum values for the slide. The variable argument links the value of the slider to an integer valued variable. The command argument links the slider to a function that is called whenever the slider is moved. A Label widget is used to display the value of the test score – this will be updated when the slider is moved.

test_score_label = Label(left_frame, text="Test score", font=("-size", 15, "-weight", "bold"))
test_score_label.grid(row=5, column=0)
testScore = IntVar()
test_score_scale = Scale(left_frame, from_=0, to=100, orient=HORIZONTAL, variable=testScore, command=update_score_display)
test_score_scale.grid(row=5, column=1)
test_score_display = Label(left_frame, text="Score is 0")
test_score_display.grid(row=6, column=1)

The function update_score_display is called whenever the slider is moved. This function updates the text displayed in the test score display label by getting the current value of the test score variable. The function, as shown below, is placed after any import commands with other function definitions.

def update_score_display(event):
    test_score_display.config(text="Score is "+ str(testScore.get()))

A screenshot of the resulting slider is shown below.

Step 8: Radio buttons

Radio buttons allow the user to make a single selection from a predefined list of choices. The selection is made by choosing the appropriate button. For our application users will select their favourite pet by clicking the appropriate button.

The radio buttons are grouped together using a LabelFrame, which as its name suggests is a frame that includes a text label.
A string-valued variable is used to store the value of the favourite pet – this variable is then linked to each of the radio buttons.

fave_animal = StringVar()
pet_frame = LabelFrame(right_frame, text="Favourite Pet")
pet_frame.grid(row=0, column=0, padx=10)
dog_lover_label= Label(pet_frame, text="Dog Lover")
dog_lover_label.grid(row=0, column=0)
dog_lover_select = Radiobutton(pet_frame, textvariable=fave_animal, value="dog")
dog_lover_select.grid(row=0, column=1)
cat_lover_label = Label(pet_frame, text="Cat Lover")
cat_lover_label.grid(row=1, column=0)
cat_lover_select = Radiobutton(pet_frame, textvariable=fave_animal, value="cat")
cat_lover_select.grid(row=1, column=1)
rabbit_lover_label = Label(pet_frame, text="Rabbit Lover")
rabbit_lover_label.grid(row=2, column=0)
rabbit_lover_select = Radiobutton(pet_frame, textvariable=fave_animal, value="rabbit")
rabbit_lover_select.grid(row=2, column=1)

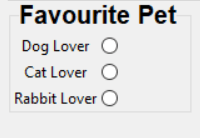
The resulting label frame containing three labelled radio buttons is shown below.
Step 9: Adding check buttons

In this step check buttons are used to allow the user to select zero or more showbags. The check buttons are grouped together in a labelled frame and placed below the radio buttons frame. For each option there is an associated Boolean-valued variable that switches between true and false, with the default value in this case being false. Checkbutton widgets include a text label and a variable option which associates with the corresponding Boolean-valued variable.

showbag_frame = LabelFrame(right_frame, text="Showbag Order")
showbag_frame.grid(row=1, column=0, padx=10, pady=10)

warheads = BooleanVar()
warheads_select = Checkbutton(showbag_frame, text="Warheads", variable=warheads)
warheads_select.grid(row=0, column=0, sticky=W)

freddo = BooleanVar()
freddo_select = Checkbutton(showbag_frame, text="Freddo", variable=freddo)
freddo_select.grid(row=1, column=0, sticky=W)

blues_clues = BooleanVar()
blues_clues_select = Checkbutton(showbag_frame, text="Blue's Clues", variable=blues_clues)
blues_clues_select.grid(row=2, column=0, sticky=W)

Final application

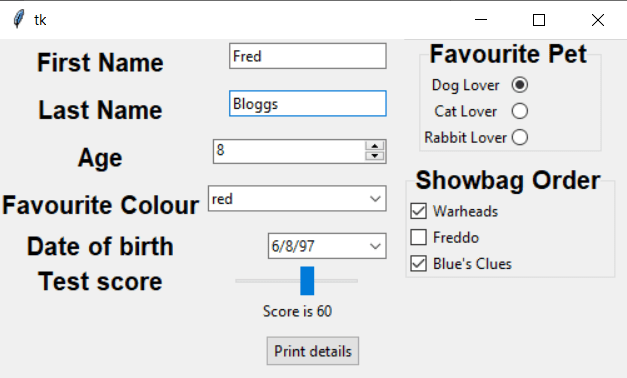
A screenshot of the final application is shown below.
Below is a full code listing.

import tkinter as tk
from tkinter import *
from tkinter import messagebox
from tkinter.ttk import *
from tkcalendar import Calendar, DateEntry


def print_details():
    print(first_name.get(), last_name.get())
    messagebox.showinfo("Details", "hello " + str(first_name.get()) + " " + str(last_name.get()))

def update_score_display(event):
    test_score_display.config(text="Score is "+ str(testScore.get()))
# create the main application window
root = Tk()

# create a frame for a variety of entry and scale widgets
left_frame = Frame(root)
left_frame.grid(row=0, column=0)

right_frame = Frame(root)
right_frame.grid(row=0, column=1, sticky=N)

button_frame = Frame(root)
button_frame.grid(row=1, column=0, columnspan=2)
# label and entry widgets used to enter information. Values linked to string variable.
first_name_label = Label(left_frame, text="First Name", justify="center", font=("-size", 15, "-weight", "bold"))
first_name_label.grid(row=0, column=0, padx=5, pady=5)
first_name = StringVar()
first_name_entry = Entry(left_frame, textvariable=first_name)
first_name_entry.grid(row=0, column=1, padx=5, pady=(0, 10), sticky=tk.E)

last_name_label = Label(left_frame, text="Last Name", justify="center", font=("-size", 15, "-weight", "bold"))
last_name_label.grid(row=1, column=0, ipady=5)
last_name = StringVar()
last_name_entry = Entry(left_frame, textvariable=last_name)
last_name_entry.grid(row=1, column=1, padx=5, pady=(0, 10), sticky=tk.E)


print_button = Button(button_frame, text="Print details", command=print_details)
print_button.grid(row=0, column=0, padx=5, pady=10)

age_label = Label(left_frame, text="Age", justify="center", font=("-size", 15, "-weight", "bold"))
age_label.grid(row=2, column=0, ipady=5)
age = IntVar()
age_entry = Spinbox(left_frame, textvariable=age, from_=0, to=100)
age_entry.grid(row=2, column=1, padx=5, pady=(0, 10), sticky=tk.E)

colour_label = Label(left_frame, text="Favourite Colour", justify="right", font=("-size", 15, "-weight", "bold"))
colour_label.grid(row=3, column=0, ipady=5)
colour = StringVar()
colour_list = [
    'green',
    'blue',
    'red',
    'yellow',
    'orange',
    'purple',
    'pink'
]
colour_entry = Combobox(left_frame, textvariable=colour, values=colour_list)
colour_entry.grid(row=3, column=1, padx=5, pady=(0, 10), sticky=tk.E)

dob_label = Label(left_frame, text="Date of birth", justify="right", font=("-size", 15, "-weight", "bold"))
dob_label.grid(row=4, column=0)
dob_entry = DateEntry(left_frame, width=12, locale="en_AU", background='darkblue', foreground='white', borderwidth=2, year=2000)

dob_entry.grid(row=4, column=1, padx=5, sticky=tk.E)

test_score_label = Label(left_frame, text="Test score", font=("-size", 15, "-weight", "bold"))
test_score_label.grid(row=5, column=0)
testScore = IntVar()
test_score_scale = Scale(left_frame, from_=0, to=100, orient=HORIZONTAL, variable=testScore, command=update_score_display)
test_score_scale.grid(row=5, column=1)
test_score_display = Label(left_frame, text="Score is 0")
test_score_display.grid(row=6, column=1)

s = Style()
s.configure('TLabelframe.Label', font=("-size", 15, "-weight", "bold"))

fave_animal = StringVar()
pet_frame = LabelFrame(right_frame, text="Favourite Pet")
pet_frame.grid(row=0, column=0, padx=10)
dog_lover_label= Label(pet_frame, text="Dog Lover")
dog_lover_label.grid(row=0, column=0)
dog_lover_select = Radiobutton(pet_frame, textvariable=fave_animal, value="dog")
dog_lover_select.grid(row=0, column=1)
cat_lover_label = Label(pet_frame, text="Cat Lover")
cat_lover_label.grid(row=1, column=0)
cat_lover_select = Radiobutton(pet_frame, textvariable=fave_animal, value="cat")
cat_lover_select.grid(row=1, column=1)
rabbit_lover_label = Label(pet_frame, text="Rabbit Lover")
rabbit_lover_label.grid(row=2, column=0)
rabbit_lover_select = Radiobutton(pet_frame, textvariable=fave_animal, value="rabbit")
rabbit_lover_select.grid(row=2, column=1)

showbag_frame = LabelFrame(right_frame, text="Showbag Order")
showbag_frame.grid(row=1, column=0, padx=10, pady=10)

warheads = BooleanVar()
warheads_select = Checkbutton(showbag_frame, text="Warheads", variable=warheads)
warheads_select.grid(row=0, column=0, sticky=W)

freddo = BooleanVar()
freddo_select = Checkbutton(showbag_frame, text="Freddo", variable=freddo)
freddo_select.grid(row=1, column=0, sticky=W)

blues_clues = BooleanVar()
blues_clues_select = Checkbutton(showbag_frame, text="Blue's Clues", variable=blues_clues)
blues_clues_select.grid(row=2, column=0, sticky=W)

root.mainloop()
Creating a dice game in Python (part 3)

In this post we continue developing a dice game in Python.

  • In Iteration 1 we coded a single round of the dice game for one player.
  • In Iteration 2 we added an additional loop so that multiple rounds were completed until the target score is reached.

Iteration 3

For this iteration we add a second player to the game. A high-level design for the revised game is shown below.

set target
set score1 to 0
set score2 to 0

while score1 < target and score2 < target
   player1 completes their turn
   update score1
   player2 completes their turn
   update score2
end while

output winner and scores

In the algorithm above, if player 1 reaches the target score, then player 2 will also get a turn before the loop terminates. However, the game should terminate as soon as one player reaches the target score. Another issue that we need to consider is ensuring that the amount of repeated code is minimised. A literal interpretation of the pseudocode above can lead to repeated code which we should avoid.

We improve the algorithm by adding a current player counter to keep track of who the current player is.

set target
set score1 to 0
set score2 to 0
set current_player to 1

while score1 < target and score2 < target
   current_player completes their turn
   if current_player = 1
   then
      update score1
      set current_player to 2
   else
      update score2
      set current_player to 1
   end if
end while

output winner and scores

After refining the algorithm to reduce the amount of repeated code we implement the algorithm in Python.
The first part of the code, as shown below, includes the necessary package imports together with variable initialisations. The variable current_player is used to track which player has the current turn. Initially this has a value of 1 (for player one) and will alternate between 1 and 2 until the game is complete.

import random
import time

target = 200
score1 = 0
score2 = 0
current_player = 1

The next block of code contains the main control loop and code for running the current player's round. The condition for the control loop (highlighted in the code listing) checks whether both scores are below the target score. The next line of code provides an indication of who the current player is.

while score1 < target and score2 < target:
    print("Player", current_player, "turn")
    round_score = 0
    valid = True
    while valid:
        roll1 = random.randint(1, 6)
        roll2 = random.randint(1, 6)
        total = roll1 + roll2
        if total == 7:
            valid = False
            print(total)
        else:
            round_score = round_score + total
            print(total, end=", ")
    print("You scored", round_score, "this round")

The block of code starting at line 23 is responsible for printing the total score of the current player and then updating the value of the current player before the while loop runs again. The code includes a conditional statement that checks who the current player is. Note that the code in the two branches of the condition block are very similar. This provides further opportunities for improving (refactoring) the code to reduce repetition. This is explore in the next part of the tutorial where we generalise to any number of players.

    if current_player == 1:
        score1 = score1 + round_score
        print("Total score for player 1 is", score1)
        current_player = 2
    else:
        score2 = score2 + round_score
        print("Total score for player 2 is", score2)
        current_player = 1
    time.sleep(1)

The final block of code outputs the winner of the game together with the final score. The winner is determined by comparing the scores of the two players within an if statement condition.

if score1 > score2:
    print("Player 1 wins", score1, "to", score2)
else:
    print("Player 2 wins", score2, "to", score1)

Example output that is generated when the code is run is shown below. Note that for brevity the output has been elided with only the first three and last round shown.

Player 1 turn
9, 10, 11, 6, 7
You scored 36 this round
Total score for player 1 is 36
Player 2 turn
2, 8, 10, 7
You scored 20 this round
Total score for player 2 is 20
Player 1 turn
6, 5, 9, 6, 9, 11, 10, 6, 9, 7
You scored 71 this round
...
Player 2 turn
11, 8, 11, 4, 6, 6, 5, 10, 5, 9, 7
You scored 75 this round
Total score for player 2 is 234
Player 2 wins 234 to 154

Creating a dice game in Python (part 2)

Iteration 2

In the second iteration of the development of Seven Out we add an outer loop so that the game will continue until the player’s total score equals or exceeds the target score – in this case 200. In the pseudocode shown below the outer loop is modelled as a while loop with a condition to check whether the target score has been met. The algorithm used inside of the outer loop is the same as that used in iteration 1 except a new variable is used to keep track of the score for the current round.


set target to 200
set score to 0
while score < target
   set round_score to 0
   loop
      set total to sum of two random integers between 1 and 6
      if total = 7
      then
         exit loop
      else
         add total to round_score
      end if
    end loop
    output round_score
end while
output score

The code written for this iteration is similar to that from iteration 1. New lines of code are highlighted in the listing below. Line 6 contains a while loop with a condition that checks that the score is less than the target. The while loop will continue while
this condition is true. In particular this while loop will always run at least once. Line 7 creates a new variable to represent the score for the current round - the value for this variable is reset to zero each time the outer loop is repeated. Line 17 updates the round score by adding the current dice total. Note that when a total of 7 is rolled this is not added to the round score.

import random

target = 200
score = 0

while score < target:
    round_score = 0
    valid = True
    while valid:
        roll1 = random.randint(1, 6)
        roll2 = random.randint(1, 6)
        total = roll1 + roll2
        if total == 7:
            valid = False
            print(total)
        else:
            round_score = round_score + total
            print(total, end=", ")
    score = score + round_score
    print("You scored", round_score, "this round")
    print("Total score is", score)

print("Well done. You got to", target)

Line 18 of the code uses an option within the print statement to alter its behaviour. The end option will by default print a newline character at the end of the output, meaning that subsequent output will appear on a new line. In this case we replace the default behaviour and instead end with a comma followed by a space. This means all of the totals for a round will be printed out on one line.

Output generated by running the game is shown below. For each round a list of comma-separated dice totals are shown, followed by the total for that round and then the total score. At the end of the game the player's total is shown.

8, 2, 3, 8, 2, 4, 9, 7
You scored 36 this round
Total score is 36
9, 5, 8, 10, 7
You scored 32 this round
Total score is 68
7
You scored 0 this round
Total score is 68
2, 9, 5, 11, 4, 4, 10, 6, 11, 11, 3, 4, 7
You scored 80 this round
Total score is 148
3, 6, 9, 7
You scored 18 this round
Total score is 166
6, 5, 5, 4, 7
You scored 20 this round
Total score is 186
8, 6, 4, 3, 6, 6, 7
You scored 33 this round
Total score is 219
Well done. You got to 200

Creating a dice game in Python (part 1)

Introduction

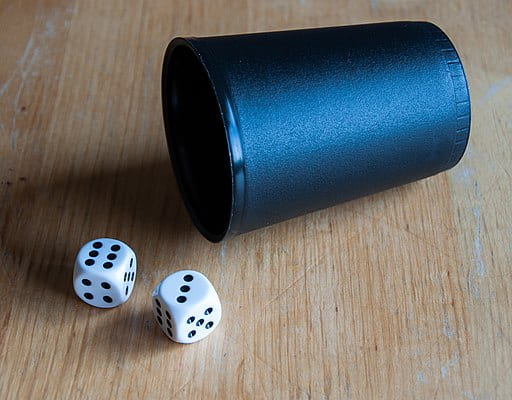
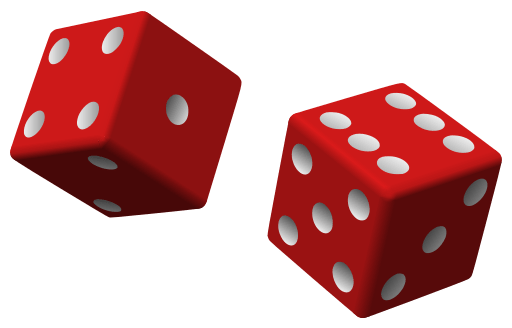
In this series of posts we will look at how to code a simple dice game in Python, starting with the initial concept, all the way through to the coding and adding extension features.


The game that we will develop is a simple two dice game called Sevens out. The game rules from lovetoknow.com are as follows:

Game rules

  1. The players decide upon a winning score, this could be 500 or 1,000.
  2. Each player, in turn, throws the dice.
  3. Each player rolls and continues to roll the dice until they throw a 7.
  4. They score the sum of all the numbers thrown before the 7.
  5. Players announce their tally after each throw and once they have thrown a 7, their score is noted on the score sheet.
  6. Doubles score double the value. For example, if a player who throws two 4s making eight, their score is 16.
  7. The player reaches the pre-arranged total first is the winner.

Iteration 1

Rather than attempting to develop the entire game in one pass, we will develop the game in multiple stages using an iterative development approach.
For the first iteration we will get one round of dice rolling completed for a single player.

Before writing any code we will develop a high-level design using pseudocode. This allows us to consider the key logical parts of the algorithmic solution without having to get bogged downed in the finer details of exactly how to code this in Python.

The pseudocode for our proposed first iteration is shown below. The most important part of the pseudocode is that it conveys the intended logic of the problem we are solving. For example the third and fourth lines of pseudocode indicates that a random number between 1 and 6 needs to be generated. How this is done does not matter at this stage – indeed the solution is dependent on the coding language being used, whereas pseudocode should be coding language independent.


set score to 0
loop
   set roll1 to random number between 1 and 6
   set roll2 to random number between 1 and 6
   set total to roll1 + roll2
   if total = 7
   then
      exit the loop
   else
      set score to score + total
   end if
end loop
output score

The resulting code in Python is almost a line for line translation of the pseudocode. One noteworthy change is the addition of a Boolean-valued variable, valid, which is used to indicate whether all rolls to date are valid (do not add up to 7). The while loop will continue whilst this variable is true. When a total of 7 is rolled the value of the variable becomes false. The use of this loop termination variable is highlighted in the code below. The relationship between the remainder of the code and the pseudocode should hopefully be evident.

import random

valid = True
score = 0

while valid:
    roll1 = random.randint(1, 6)
    roll2 = random.randint(1, 6)
    total = roll1 + roll2
    if total == 7:
        valid = False
    else:
        score = score + total

print("Score is", score)

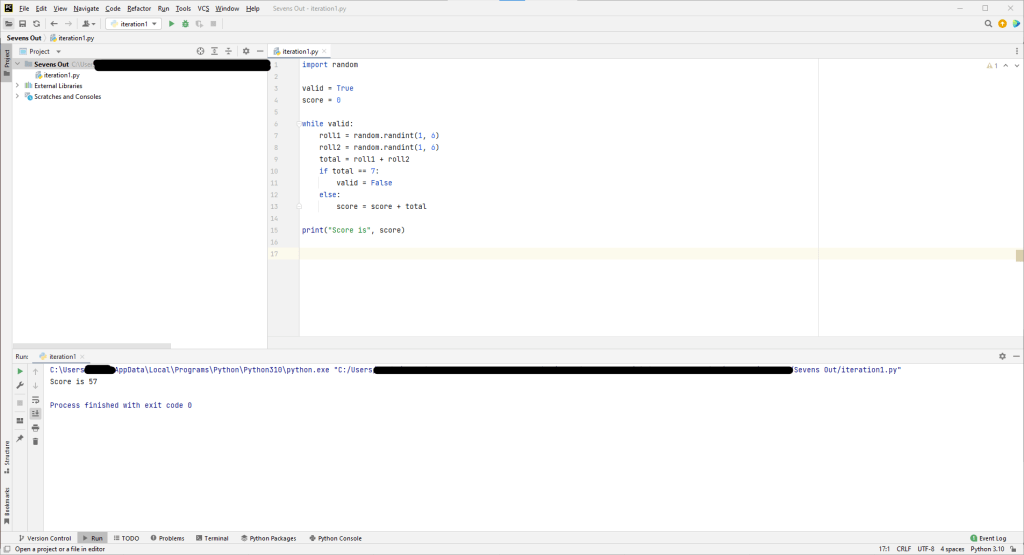
The screenshot below shows the code running in the Pycharm IDE. The code runs until a total of 7 is rolled and then prints the resulting score.

Measurement Toolkit (part 3)

Surface area calculator

In this tutorial we describe how to add functionality for calculating the surface area of various shapes to the Measurement Toolkit. The screenshot below shows the tool being used to calculate the surface area of a rectangular prism.

Surface Area Calculator

The tool is designed so that we can easily extend it with functionality for calculating the surface area for additional 3d shapes. The main steps involved in adding a new shape to the surface area calculator are:

  1. Research the shape to determine an appropriate formula for calculating its surface area
  2. Design and implement test cases that will be run to check the correctness of calculations in the tool
  3. Code a function to calculate the surface area of the chosen shape
  4. Create an image file to represent the shape in the tool
  5. Link the calculation function and image to the main interface

In the following sections we will look at the process used to add cubes to the surface area calculator.
Given a cube with sides of length a, then the surface area is given by the following formula:
SA=6a^2
The formula is derived by noting that the cube has six faces of equal size. Each face is a square with dimensions of a by a units.

Designing test cases

The next step is design and implement test cases for calculating the surface area of a cube. These should be designed initially on paper before being added to surface area tester file.
For the first test case we consider a cube with sides of length 5 units:

SA=6\times 5^2=6 \times 25 = 150\mathrm{units^2}

For the second test case a side length of 3.275 units is selected. The resulting surface area is rounded to two decimal places:

SA=6\times 3.275^2 = 64.35375 \approx 64.35 \mathrm{units^2}

These test cases were then coded in the surface_area_tester.py file as shown below. The tester file imports the surface area file on line 2, which contains the surface area calculation functions. It is assumed that the function for calculating the surface area of a cube is called calc_cube_sa, which takes a single input representing the length of the cube edges. Because the expected answer for the second test case was rounded to 2 decimal places we use assertAlmostEqual which in this case checks that the value returned by the calc_cube_sa after rounding to 2 decimal places is equal to the expected answer of 64.35.

import unittest
from surface_area import *

class TestSurfaceArea(unittest.TestCase):
    def test_calc_cube_sa(self):
        self.assertEqual(calc_cube_sa(5),150)
        self.assertAlmostEqual(calc_cube_sa(3.275),64.35,2)

if __name__ == '__main__':
    unittest.main()

Note that in the code above we have placed two test cases within the same test function allowing us to group the tests together based on the shape being tested.

Coding the surface area calculation functions

Functions for calculating the surface area of different 3d shapes are include in the surface_area.py file. The following code listing shows the code for the calc_cube_sa function. The file also includes a code stub for calc_rprism_sa, which will be used to calculate the surface area of a rectangular prism.
The file imports the math package which will be used later for doing calculations involving the constant pi.

import math

def calc_cube_sa(length):
    return 6*(length)**2

def calc_rprism_sa(length,width,height):
    return 0

Functions for additional surface area calculations should be added after the given functions.

After the functions have been written they should be tested by running the test cases in surface_area_tester.py.

Creating 3d shapes

Images representing the different 3d shapes used in the surface area calculator tool need to be created and added to the Images directory.
The following link explains how to
create 3d shapes in Illustrator. Another option is to create the 3d shapes using Efofex Draw.

Linking the components in the main interface

The final step in creating and adding to the surface area functionality of the Measurement Toolkit is to incorporate the calculation functions and images in the main mathtoolkit.py file.

##
## ADD NEW SHAPES HERE FOR SURFACE AREA
##
sa_shapes['Cube']=[['l'],"Images/cube.png","calc_cube_sa"]
sa_shapes['Rectangular Prism']=[['l','w','h'],"Images/rect_prism.png","calc_rprism_sa"]

Line 4 shows the configuration for cube. The string inside the first pair of square brackets is the name of the shape as presented in the tool. After the equal symbol, the list of variables, the name of the image file, and finally the name of the calculation function are given.
Line 5 shows a similar configuration for rectangular prisms. In this case the user will be required to enter values for three variables representing the length, width and height respectively.

Measurement Toolkit (part 2)

Unit conversions

In the first step of the Measurement toolkit tutorial we downloaded the initial source code and installed the pillow package. In this step we will complete the functionality and testing for the unit conversion part of the tool. This will consist of conversions for metric units for length, area and volume.

Testing length conversions

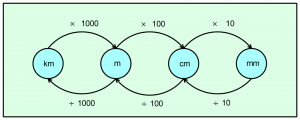
We begin by considering conversions for metric units of length. The following diagram shows the process for converting between the four most widely used units (millimetres, centimetres, metres and kilometres).

Converting metric units of length


To perform a conversion we follow the arrows from the initial unit to the target unit, applying the operation attached to each arc.
Conversion calculations are firstly written by hand – these will then form the basis for test cases. For example, calculations for converting kilometres to millimetres are shown below.

1.2\mathrm{km}=1.2 \times 1000 = 1200\mathrm{m}
1200\mathrm{m} = 1200 \times 100 = 120000\mathrm{cm}
120000\mathrm{cm}=120000 \times 10 = 1200000\mathrm{mm}

Once calculations have been done to cover all of the metric length unit conversions they should be coded in the convert_units_tester.py file. The existing code for this is shown below. Test cases for converting from metres have already been included. The highlighted code (lines 6 and 7) contains a function to test whether the conversion from metres to millimetres is correct.
Each test case function begins with the keyword def followed by the name of the function, in this case test_m_to_mm, finally we include the input variable self in brackets followed by a colon. The first line of each test case function will the same except the function name will differ – ensure you give a meaningful name and make sure each function has a different name. The second line of the function contains the actual test case. The assertEqual function takes two arguments. The first argument on line 7 calls the convert_length_unit function and returns a result. The second argument contains the expected (correct) result. If the first argument equals the second argument then the test passes. Otherwise the test fails, indicating that we probably have an error in the code in the convert_length_unit in the file convert_units.py.

import unittest
from convert_units import *

class TestConvertUnits(unittest.TestCase):

    def test_m_to_mm(self):
        self.assertEqual(convert_length_unit(0.23,"m","mm"),230)
    def test_m_to_cm(self):
        self.assertEqual(convert_length_unit(0.25,"m","cm"),25)
    def test_m_to_m(self):
        self.assertEqual(convert_length_unit(178,"m","m"),178)
    def test_m_to_km(self):
        self.assertEqual(convert_length_unit(19000,"m","km"),19)

if __name__ == '__main__':
    unittest.main()

The tester code imports the code in convert_units.py on line 2, which contains the conversion functions. We will look at this file in more detail a little later. Before we do so we must complete the length unit conversion tests in convert_units_tester.py file.

For example, to add a test based on the kilometre to millimetre calculation shown earlier we would add the following code.

    def test_km_to_mm(self):
        self.assertEqual(convert_length_unit(1.2,"km","mm"),1200000)

This code would be included immediately after the previous test functions, making sure it is indented to the same level as the other test functions.
When the tester code is run it creates a report on how many tests passed or failed. The ultimate aim is obviously to pass all tests.
To ensure that all functionality is tested we should have at least one test case for each possible conversion, including conversions from a unit to itself (e.g. from metres to metres).
This means that you will need to write at least sixteen (16) length conversion tests.

When you run your length conversion tests you should get a number of failed tests – these represent errors in the convert_length_unit code. As mentioned the code for this function is given in the convert_units.py file and is listed below. Running the tests should help you identify the errors in the code. These should be corrected and tests should be rerun to ensure the function is free of errors.

def convert_length_unit(value,inunit, outunit):
    if (inunit==outunit):
        result=value
    elif (inunit=="m") & (outunit=="mm"):
        result=value*1000
    elif (inunit=="m") & (outunit=="cm"):
        result=value*10
    elif (inunit=="m") & (outunit=="km"):
        result=value*1000
    elif (inunit=="km") & (outunit=="mm"):
        result=value*1000000
    elif (inunit=="km") & (outunit=="cm"):
        result=value*10000
    elif (inunit=="km") & (outunit=="m"):
        result=value*1000
    elif (inunit=="cm") & (outunit=="mm"):
        result=value*100
    elif (inunit=="cm") & (outunit=="m"):
        result=value/100
    elif (inunit=="cm") & (outunit=="km"):
        result=value/100*1000
    elif (inunit=="mm") & (outunit=="cm"):
        result=value/10
    elif (inunit=="mm") & (outunit=="m"):
        result=value/1000
    elif (inunit=="mm") & (outunit=="km"):
        result=value/1000*1000
    return result

The function takes three input arguments, the first is the numerical value to be converted, the second is the original units of the measurement, and the third is the target units of the measurement. The function is implemented using a nested if-then-else statement. At the end of the function the converted measurement is returned as the result.

Area conversions

The next step is to develop the area unit conversions.
If you are doing this part of the development in pairs, then one person should design and develop the test cases in convert_units_tester.py, while the second person writes the area conversion function in convert_units.py

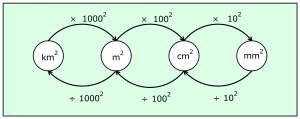
The diagram below shows the conversion process for units of area.

Area unit conversions

For example, consider the following conversion calculation:
5.8\mathrm{m^2} = 5.8 \times 100^2= 58000 \mathrm{cm^2}
58000\mathrm{cm^2}=58000 \times 10^2 = 5800000 \mathrm{mm^2}

This process can be repeated on paper to design test cases for each of the 16 possible area conversions (remember we need to include tests that check that conversions for a unit to itself leave the value unchanged). Once the test cases have been calculated on paper they can be added to the convert_units_tester.py file. The should be added immediately after the length unit test functions. For example, the test case calculated above would be written as:

    def test_m2_to_mm2(self):
        self.assertEqual(convert_area_unit(5.8, "m2", "mm2"), 5800000)

Notice that the test function name indicates that units of area are being converted – don’t forget to include the correct units in the function name. The test is implemented by calling the assertEqual function. This in turn calls convert_area_unit which takes three arguments – the original area measurement, the original units of area and the target units of area. The units of area include a 2 at the end to distinguish them from units of length.

The last step in the process is to write the code for the convert_area_unit function, contained in the
convert_units.py file. In the supplied code this function is written as a code stub, meaning that the function is defined, but it is not implemented correctly. In this case the function stub returns 0 regardless of the inputs to the function as shown below.

def convert_area_unit(value,inunit,outunit):
    return 0

The second line of the function needs to be replaced by code similar to that given for the convert_length_unit function, remembering though that the units of area will all need to include a 2 at the end. To implement this function, you should use the earlier area conversion diagram as a guide.

Once the code for the convert_area_unit function has been written, then you should test it by running the test cases in convert_units_tester.py.

Volume conversions

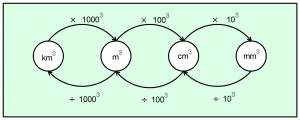
The last step in completing the unit conversions for the Measurement toolkit is to add volume conversions. As with the area conversions, if you are working in pairs one person should work on designing and implementing the test cases, while the other person develops the conversion code. For this task however you should swap roles.

Volume conversions

The calculations for an example conversion is shown below:
19500000\mathrm{mm^3}=19500000 \div 10^3 = 19500 \mathrm{cm^3}
19500\mathrm{cm^3} = 19500 \div 100^3 = 0.0195 \mathrm{m^3}

Calculations should be completed for all 16 possible conversions. These test cases should then be implemented in the convert_units_tester.py file.
The conversion functionality is added to the tool by implementing the following code stub in
the convert_units.py file, replacing the second line with appropriate code.

def convert_volume_unit(value,inunit,outunit):
    return 0

Measurement Toolkit (part 1)

Introduction

In this series of tutorials we explain how to develop a Measurement toolkit which provides functions for converting units of measurement and calculating the surface area and volume of a range of 3d shapes.

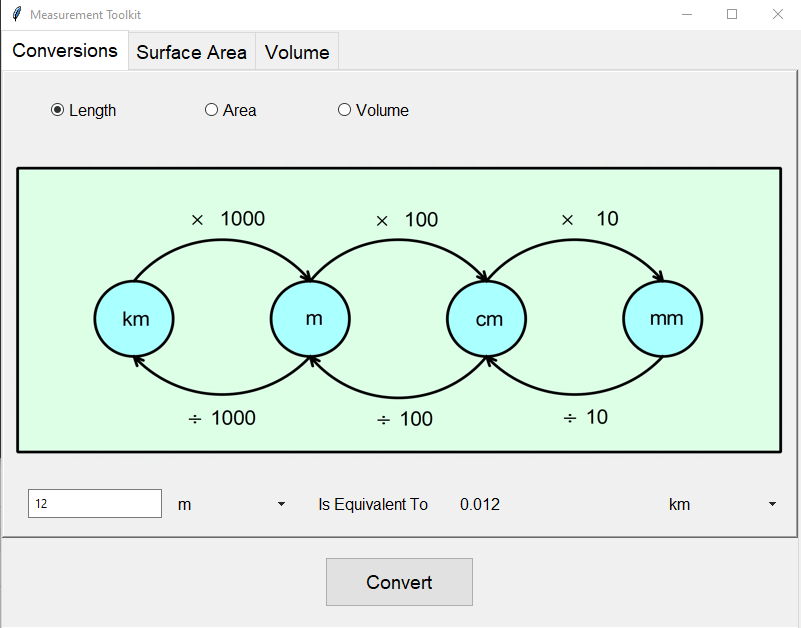
A screenshot showing the Measurement toolkit is given below showing the unit conversion capabilities of the tool.

Unit conversions in the Measurement Toolkit

Initial setup

The starting point for the development of the Measurement Toolkit is to download the initial source code files for the Measurement Toolkit. This zip file should be downloaded and extracted to a suitable location. These files provide the basic skeletal code for the application. It includes graphical user interface (GUI) code, together with stubs for the functions that do the conversions and calculations.

The files are listed below, with full code listings that can be expanded and view. We will describe each of these files in more detail in later parts of this tutorial as required.

  • convert_units.py – will contain functions for carrying out unit conversions. Code is provided in this file for converting units of length, however several errors have been included which need to be found through testing and fixed. Stubs (incomplete functions) for converting area and volume units are also given.
  • def convert_length_unit(value,inunit, outunit):
        if (inunit==outunit):
            result=value
        elif (inunit=="m") & (outunit=="mm"):
            result=value*1000
        elif (inunit=="m") & (outunit=="cm"):
            result=value*10
        elif (inunit=="m") & (outunit=="km"):
            result=value*1000
        elif (inunit=="km") & (outunit=="mm"):
            result=value*1000000
        elif (inunit=="km") & (outunit=="cm"):
            result=value*10000
        elif (inunit=="km") & (outunit=="m"):
            result=value*1000
        elif (inunit=="cm") & (outunit=="mm"):
            result=value*100
        elif (inunit=="cm") & (outunit=="m"):
            result=value/100
        elif (inunit=="cm") & (outunit=="km"):
            result=value/100*1000
        elif (inunit=="mm") & (outunit=="cm"):
            result=value/10
        elif (inunit=="mm") & (outunit=="m"):
            result=value/1000
        elif (inunit=="mm") & (outunit=="km"):
            result=value/1000*1000
        return result
    
    def convert_area_unit(value,inunit,outunit):
        return 0
    
    def convert_volume_unit(value,inunit,outunit):
        return 0
    
  • convert_units_tester.py – will contain test cases to check the correctness of the unit conversion functions. Test cases have been written for converting from metres to other units. Using the same syntax you will be required to complete the other test cases.
  • import unittest
    from convert_units import *
    
    class TestConvertUnits(unittest.TestCase):
    
        def test_m_to_mm(self):
            self.assertEqual(convert_length_unit(0.23,"m","mm"),230)
        def test_m_to_cm(self):
            self.assertEqual(convert_length_unit(0.25,"m","cm"),25)
        def test_m_to_m(self):
            self.assertEqual(convert_length_unit(178,"m","m"),178)
        def test_m_to_km(self):
            self.assertEqual(convert_length_unit(19000,"m","km"),19)
    
    if __name__ == '__main__':
        unittest.main()
    
  • mathtoolkit.py – the main program file, containing of the GUI code and user configurable code allowing additional shapes to be added to the surface area and volume calculator parts of the tool
  • from tkinter import *
    from tkinter import ttk
    from convert_units import *
    from surface_area import *
    from volume import *
    from PIL import Image,ImageTk
    import math
    
    
    def convert_units_and_display():
        if (unitsvar.get()==1):
            converted=convert_length_unit(float(unitval.get()),funitvar.get(),tunitvar.get())
        elif (unitsvar.get()==2):
            converted=convert_area_unit(float(unitval.get()),funitvar.get(),tunitvar.get())
        elif (unitsvar.get()==3):
            converted=convert_volume_unit(float(unitval.get()),funitvar.get(),tunitvar.get())
        convertedval.set(str(converted))
        
    def change_unit_options():
        m1=foptnmenu['menu']
        m1.delete(0,END)
        m2=toptnmenu['menu']
        m2.delete(0,END)
        
        if (unitsvar.get()==2):
            newvalues=['mm2','cm2','m2','km2']
            funitvar.set("m2")
            tunitvar.set("m2")
            image=Image.open("Images/area_convert.png").resize((780,300))
            img=ImageTk.PhotoImage(image)
            cimage_label.configure(image=img)
            cimage_label.image=img
    
        elif(unitsvar.get()==3):
            newvalues=['mm3','cm3','m3','km3']
            funitvar.set("m3")
            tunitvar.set("m3")
            image=Image.open("Images/volume_convert.png").resize((780,300))
            img=ImageTk.PhotoImage(image)
            cimage_label.configure(image=img)
            cimage_label.image=img
        else:
            newvalues=['mm','cm','m','km']
            funitvar.set("m")
            tunitvar.set("m")
            image=Image.open("Images/length_convert.png").resize((780,300))
            img=ImageTk.PhotoImage(image)
            cimage_label.configure(image=img)
            cimage_label.image=img
    
        
        for val in newvalues:
            m1.add_command(label=val,command=lambda v=funitvar,l=val:funitvar.set(l))
            m2.add_command(label=val,command=lambda v=tunitvar,l=val:tunitvar.set(l))
    
    
    def display_shape_sa(self):
        sproperties=sa_shapes[shapevar.get()]
        refresh_surface_area(sproperties[0],
                             sproperties[1])
        
    
    def calc_surface_area():
        arglist=""
        for i in range(0,len(valarray)-1):
            arglist=arglist+"{0},".format(valarray[i].get())
        arglist=arglist+"{0}".format(valarray[len(valarray)-1].get())
        answer=(eval(sa_shapes[shapevar.get()][2]+"("+arglist+")"))
        sa_text.set("Surface Area of {0} is {1:.2f} units^2".format(shapevar.get(),answer))


    def refresh_surface_area(varlist,imageloc):
        valarray.clear()
        for l in range(0,len(varlabels)):
            varlabels[l].destroy()
        for l in range(0,len(varentries)):
            varentries[l].destroy()
        for i in range(0,len(varlist)):
            valarray.append(StringVar(main))
            lab=ttk.Label(vframe,text="{0}=".format(varlist[i]))
            lab.grid(row=i+1,column=0,pady=20,sticky=W)
            varlabels.append(lab)
            entry=ttk.Entry(vframe,width=20,textvariable=valarray[i])
            entry.grid(row=i+1,column=1,sticky=W)
            varentries.append(entry)
        image=Image.open(imageloc).resize((400,400))
        img=ImageTk.PhotoImage(image)
        image_label.configure(image=img)
        image_label.image=img
    
    def display_shape_vol(self):
        vproperties=vol_shapes[vshapevar.get()]
        refresh_volume(vproperties[0],
                        vproperties[1])
        
    
    def calc_volume():
        arglist=""
        for i in range(0,len(vvalarray)-1):
            arglist=arglist+"{0},".format(vvalarray[i].get())
        arglist=arglist+"{0}".format(vvalarray[len(vvalarray)-1].get())
        answer=(eval(vol_shapes[vshapevar.get()][2]+"("+arglist+")"))
        vol_text.set("Volume of {0} is {1:.2f} units^3".format(vshapevar.get(),answer))


    def refresh_volume(varlist,imageloc):
        vvalarray.clear()
        for l in range(0,len(vvarlabels)):
            vvarlabels[l].destroy()
        for l in range(0,len(vvarentries)):
            vvarentries[l].destroy()
        for i in range(0,len(varlist)):
            vvalarray.append(StringVar(main))
            lab=ttk.Label(vframe2,text="{0}=".format(varlist[i]))
            lab.grid(row=i+1,column=1,pady=20)
            vvarlabels.append(lab)
            entry=ttk.Entry(vframe2,width=20,textvariable=vvalarray[i])
            entry.grid(row=i+1,column=2)
            vvarentries.append(entry)
        image=Image.open(imageloc).resize((400,400))
        img=ImageTk.PhotoImage(image)
        vimage_label.configure(image=img)
        vimage_label.image=img
    ####################
    ## Top level GUI setup
    ######################
    
    main=Tk()
    main.title('Measurement Toolkit')
    main.geometry('800x600')
    rows=0
    
    main.grid_rowconfigure(0, weight=1)
    main.grid_columnconfigure(0, weight=1)
    
    style = ttk.Style(main)
    style.configure('TRadiobutton', font=('Helvetica', 12))
    style.configure('TNotebook.Tab', font=('Helvetica', 14), padding=5)
    style.configure('TButton', font=('Helvetica', 14), padding=10)
    style.configure('TLabel', font=('Helvetica', 12))
    style.configure('TEntry', font=('Helvetica', 12), padding=5)
    style.configure('TMenubutton', font=('Helvetica', 12), padding=5)
    
    nb=ttk.Notebook(main)


    nb.grid(row=0,sticky="nesw")


    page1=ttk.Frame(nb)
    nb.add(page1,text='Conversions')
    page2=ttk.Frame(nb)
    nb.add(page2,text='Surface Area')
    page3=ttk.Frame(nb)
    nb.add(page3,text='Volume')
    
    ##################
    ## Conversions
    ###################
    page1.rowconfigure(0,weight=2)
    page1.rowconfigure(1,weight=1)
    page1.columnconfigure(0,weight=1,uniform=1)
    unitsvar=IntVar()
    unitsvar.set(1)
    
    
    cframe=ttk.Frame(page1,relief=RAISED,padding=5)
    cframe.grid(row=0,column=0,sticky="nesw")
    cframe.columnconfigure((0,1,2,3,4),weight=1)
    cframe.rowconfigure(1,weight=1)
    cframe.rowconfigure((0,2),weight=1)
    
    
    cimage_label=ttk.Label(cframe)
    cimage_label.grid(row=1,column=0,columnspan=5,sticky="ew")
    image=Image.open("Images/length_convert.png").resize((780,300))
    img=ImageTk.PhotoImage(image)
    cimage_label.configure(image=img)
    cimage_label.image=img
    
    ttk.Radiobutton(cframe,text="Length",variable=unitsvar,value=1,command=change_unit_options).grid(row=0,column=0,pady=10)
    ttk.Radiobutton(cframe,text="Area",variable=unitsvar,value=2,command=change_unit_options).grid(row=0,column=1,pady=10)
    ttk.Radiobutton(cframe,text="Volume",variable=unitsvar,value=3,command=change_unit_options).grid(row=0,column=2,pady=10)
    
    funitvar=StringVar(main)
    tunitvar=StringVar(main)
    unitchoices=['mm','cm','m','km']


    unitval=StringVar(main)
    unitval.set("0")
    convertedval=StringVar(main)
    convertedval.set("0")
    ttk.Label(cframe,text='Is Equivalent To').grid(row=2,column=2,padx=5,pady=5)
    uentry=ttk.Entry(cframe,width=20,textvariable=unitval)
    uentry.grid(row=2,column=0,sticky='E')
    foptnmenu=ttk.OptionMenu(cframe,funitvar,'m',*unitchoices)
    foptnmenu.configure(width=10)
    foptnmenu.grid(row=2,column=1)
    convertLabel=ttk.Label(cframe,textvariable=convertedval,width=20)
    convertLabel.grid(row=2,column=3)
    toptnmenu=ttk.OptionMenu(cframe,tunitvar,'m',*unitchoices)
    toptnmenu.configure(width=10)
    toptnmenu.grid(row=2,column=4)
    convertButton=ttk.Button(page1,text="Convert",
                         command=convert_units_and_display)
    convertButton.grid(row=1,column=0)
    
    #################
    ## Surface Area
    ###################
    sa_shapes={}
    
    ##
    ## ADD NEW SHAPES HERE FOR SURFACE AREA
    ##
    sa_shapes['Cube']=[['l'],"Images/cube.png","calc_cube_sa"]
    sa_shapes['Rectangular Prism']=[['l','w','h'],"Images/rect_prism.png","calc_rprism_sa"]


    ##
    ## DO NOT EDIT BELOW HERE
    ##
    
    page2.rowconfigure(0,weight=1)
    page2.rowconfigure(1,weight=1)
    page2.rowconfigure(2,weight=1)
    page2.rowconfigure(3,weight=1)
    page2.columnconfigure(0,weight=1,uniform=1)
    
    shapechoices=sa_shapes.keys()
    shapevar=StringVar(main)
    shapevar.set('Cube')
    
    shapeoptnmenu=ttk.OptionMenu(page2,shapevar,"Cube",*shapechoices,command=display_shape_sa)
    shapeoptnmenu.configure(width=30)
    shapeoptnmenu.grid(row=0,column=0,sticky=W)
    vframe=ttk.Frame(page2,relief=RAISED,padding=10)
    vframe.grid(row=1,column=0,sticky=NSEW)


    ttk.Label(vframe,text="Variables").grid(row=0,column=1,padx=20)
    iframe=ttk.Frame(page2,relief=RAISED,padding=5)
    iframe.grid(row=1,column=1,sticky=NSEW)
    valarray=[]
    varlabels=[]
    varentries=[]
    image_label=ttk.Label(iframe,background='white')
    image_label.grid(row=0,column=0)
    display_shape_sa(main)
    
    
    sa_text=StringVar()
    sa_text.set("Press Calculate button")
    ttk.Label(page2,textvariable=sa_text).grid(row=2,column=0, columnspan=2, sticky=W)
    ttk.Button(page2,text="Calculate",command=calc_surface_area).grid(row=3,column=0,columnspan=2)
    
    
    ################
    ## Volume
    ################
    vol_shapes={}
    ##
    ## ADD NEW SHAPES HERE FOR VOLUME
    ##
    vol_shapes['Cube']=[['l'],"Images/cube.png","calc_cube_vol"]
    vol_shapes['Rectangular Prism']=[['l','w','h'],"Images/rect_prism.png","calc_rprism_vol"]
    
    ##
    ## DO NOT EDIT BELOW HERE
    ##
    page3.rowconfigure(0,weight=1)
    page3.rowconfigure(1,weight=1)
    page3.rowconfigure(2,weight=1)
    page3.rowconfigure(3,weight=1)
    page3.columnconfigure(0,weight=1,uniform=1)
    vshapechoices=vol_shapes.keys()
    vshapevar=StringVar(main)
    vshapevar.set('Cube')
    
    vshapeoptnmenu=ttk.OptionMenu(page3,vshapevar,"Cube",*vshapechoices,command=display_shape_vol)
    vshapeoptnmenu.configure(width=30)
    vshapeoptnmenu.grid(row=0,column=0,sticky=W)
    vframe2=ttk.Frame(page3,relief=RAISED)
    vframe2.grid(row=1,column=0,sticky=NSEW)
    
    ttk.Label(vframe2,text="Variables").grid(row=0,column=1,columnspan=2,padx=20)
    iframe2=ttk.Frame(page3,relief=RAISED,padding=5)
    iframe2.grid(row=1,column=1,sticky=NSEW)
    vvalarray=[]
    vvarlabels=[]
    vvarentries=[]
    vimage_label=ttk.Label(iframe2,background='white')
    vimage_label.grid(row=0,column=0)
    display_shape_vol(main)
    
    vol_text=StringVar()
    vol_text.set("Press Calculate button")
    ttk.Label(page3,textvariable=vol_text).grid(row=2,column=0, columnspan=2, sticky=W)
    ttk.Button(page3,text="Calculate",command=calc_volume).grid(row=3,column=0,columnspan=2)
    
    main.mainloop()
    
  • surface_area.py – will contain the functions for calculating the surface area of various 3d shapes
  • import math
    
    def calc_cube_sa(length):
        return 6*(length)**2
    
    def calc_rprism_sa(length,width,height):
        return 0
    
  • surface_area_tester.py – will contain test cases to check the correctness of the surface area calculation functions
  • import unittest
    from surface_area import *
    
    class TestSurfaceArea(unittest.TestCase):
        def test_calc_cube_sa(self):
            self.assertEqual(calc_cube_sa(5),150)
            self.assertAlmostEqual(calc_cube_sa(3.275),64.35,2)
    
    if __name__ == '__main__':
        unittest.main()
    
  • volume.py – will contain the functions for calculating the volume of various 3d shapes
  • import math
    
    def calc_cube_vol(l):
        return l**3
    
    def calc_rprism_vol(l,w,h):
        return 0
    
  • volume_tester.py – will contain test cases to check the correctness of the volume calculation functions
  • import unittest
    from volume import *
    
    class TestVolume(unittest.TestCase):
        def test_calc_cube_vol(self):
            self.assertEqual(calc_cube_vol(5),125)
    
    if __name__ == '__main__':
        unittest.main()
    
  • Images – stores the image files that will be used to represent the 3d shapes, together with the unit conversion diagrams

To run the program you will also need to install the pillow package in Python using the following command:

pip install pillow pip --trusted-host pypi.org --trusted-host files.pythonhosted.org

Developing a text-based adventure (part 5)

Dictionaries

Dictionaries are a data structure that allow us to store related information in our game. For example we might use a dictionary to represent the attributes of the player character. Or a dictionary might be used to store the different monsters that could be encountered in the game.

Character creation

To demonstrate the use of dictionaries in a text-based adventure game we will do a walkthrough of character creation code.

The first step in character creation is to give the character a name. This name is entered with an input statement. The character name is then stored in the playerAttributes dictionary.

import random

playerAttributes={}

response=input("What is your name brave adventurer? ")
playerAttributes["name"]=response

After the player selects their character name, they need to select the character class, which can either be a fighter, wizard or healer. The character class is stored in the playerAttributes dictionary using the “class” key.
To ensure that the player selects a valid option the code is enclosed in a loop. The loop will continue until a valid response is entered as input. A Boolean-valued variable, called validResp, is used to keep track of whether or not a valid response has been entered.

validResp=False
while (not validResp):
    response=input("You may play as a [F]ighter, [W]izard or [H]ealer > ")

    if (response.upper()=="F"):
        playerAttributes["class"]="fighter"
        validResp=True
    elif (response.upper()=="W"):
        playerAttributes["class"]="wizard"
        validResp=True
    elif (response.upper()=="H"):
        playerAttributes["class"]="healer"
        validResp=True
    else:
        print("This is not a valid option")

Next the program sets the character’s health points which are initialised using a random number generator. The random module is imported at the beginning of the code listing. In this case we use the randint function, which generates a random integer (whole number) between the given lower and upper bounds. Two new attributes are added to the player attributes dictionary, the first representing the maximum number of health points (i.e. when the character is in full health), the second representing the current number of health points.

playerAttributes["hpsMax"]=random.randint(20,30)
playerAttributes["hpsCurrent"]=playerAttributes["hpsMax"]

The next part of the code listing sets up class specific attributes. Fighters have might points which can be used to perform special attacks in close combat. Wizards have power points which can be used to cast spells. Healers have salvation points which can be used to heal the player or to create protective wards. For each of the class specific attributes attributes are initialised for the maximum number of points and the current number of points.

if (playerAttributes["class"]=="fighter"):
    playerAttributes["mightMax"]=random.randint(20,40)
    playerAttributes["mightCurrent"]=playerAttributes["mightMax"]
elif (playerAttributes["class"]=="wizard"):
    playerAttributes["powerMax"]=random.randint(20,40)
    playerAttributes["powerCurrent"]=playerAttributes["powerMax"]
elif (playerAttributes["class"]=="healer"):
    playerAttributes["salvationMax"]=random.randint(20,40)
    playerAttributes["salvationCurrent"]=playerAttributes["salvationMax"]

The final part of the code listing defines a function for printing out the player attributes. The attributes are printed within a box, which is created using special box drawing Unicode characters. Note that the box characters will not display correctly in the IDLE environment – you will need to run your program within a Python shell – you can double click on the file in Windows Explorer to run the program. A for loop is used to print out each of the individual key/value pairs in the dictionary. This will print the pairs in the order they have been added to the dictionary. The upper function has been used to convert the attribute keys to all upper case characters.

def printPlayerAttributes():
    print("\u250F"+"\u2501"*18+"\u2533"+"\u2501"*20+"\u2513")
    for k,v in playerAttributes.items():
        print("\u2503{0:<18}\u2503{1:<20}\u2503".format(k.upper(),v))
    print("\u2517"+"\u2501"*18+"\u253B"+"\u2501"*20+"\u251B")  

printPlayerAttributes()

Output from the final code is shown in the image below.

Presenting dictionary attributes inside a box