Investigating Trigonometric Ratios

This classroom activity uses the Geogebra tool to derive and explore the trigonometric ratios. A right-angled triangle with given angles is created precisely and enlargements of this triangle are created. Ratios between sides are calculated and compared across all the triangles. These ratios are then compared with the sine, cosine and tangent trigonometric ratios for the given angles.

In this investigation you will explore similar right-angled triangles. Each student will explore a triangle with different angles.

  1. Record the angle assigned by your teacher, or randomly select an
    angle between 30 and 75.
  2. Open a new Geogebra window, ensuring that the grid and axes are
    both showing.

Create a right-angled triangle, with one of the angles matching your
assigned angle, using the following steps:

  1. Create a line using the “Line” tool and a second perpendicular
    line using the “Perpendicular Line” tool. The intersection of these two
    lines will form the right-angle of our right-angled triangle.

  2. Create an angle with the size specified in (1) using the “Angle
    with Given Size” tool

    1. Create a point D on the first line using the “Point on Object”
      tool. The point should appear to the right of the intersection between
      the two lines as shown in the diagram below.
    2. Select the “Angle with Given Size” tool
    3. Click on point A
    4. Click on point D
    5. Select clockwise for the angle measure
    6. Enter the size of the angle (as given in (1))
    7. Use the “Line” tool to connect the two newly created points
      (points A’ and D in the diagram below).

  3. Create two additional points (E and F below) at the intersections
    of the lines using the “Intersect” tool.
  4. Form a triangle using the “Polygon” tool that connects the three
    intersection points.

  5. Use the “Angle” tool to show the three angles within the
    triangle.
  6. Hide the unnecessary lines and points used in creating the
    triangle by de-selecting the objects in the Algebra View.

  7. Measure the lengths of each side in the triangle.
  8. Save your file at this stage (if not done so already) and export
    an PNG image file of your right-angled triangle.
  9. Using the enlargement transformation method used in Part 1,
    create enlargements of your right-angled triangle with scale factors of
    2 and 4.
  10. Measure all sides and angles in the two enlargements. Save your
    file and export a PNG image file.
  11. Record all angles, side lengths and side ratios in a table like
    the following. You should record the lengths to 5 decimal places. Go to
    Rounding under the Options menu and change the rounding settings.

    Angle Opp Adj Hyp \dfrac{Opp}{Adj} \dfrac{Opp}{Hyp} \dfrac{Adj}{Hyp}
    Triangle 1
    Triangle 2
    Triangle 3

The angle is the one given in (1). Opposite, adjacent and hypotenuse
are all measured from the given angle as shown in the following
diagram.

  1. Comment on the ratios between the three sides for the three
    triangles as shown in the table created in step (13).
  2. For your given angle, use your calculator to complete the
    following table.

    tan  θ sin  θ cos  θ
    θ=  
  3. Using the tables from (13) and (15) complete the following rules

    \tan \theta =

    \sin \theta =

    \cos \theta =

  4. Repeat step (13) using the other acute angle in your triangle,
    recording your measurements and calculations in a new table.
  5. Using the tables from (13), (15) and (17) define a rule(s) that
    connects the sine and cosine functions.

Investigating similar triangles using Geogebra

To explore properties of similar triangles we will apply enlargement transformations to a triangle using the Geogebra tool.


You can either use the online version of Geogebra or you can download Geogebra Classic 5 or Geogebra Classic 6. Note that the screen shots shown below are based on Geogebra Classic 5, however Geogebra Classic 6 is very similar.

  1. Open a new Geogebra window, ensuring that the grid and axes are shown.

  2. Using the “Move Graphics View” tool, move the window so that the window is focussed on the 1st quadrant of the Cartesian plane.

  3. Use the “Point” tool to create a point at the origin of the Cartesian plane (0,0). This is referred to as the enlargement origin.

  4. Use the “Polygon” tool to create a triangle with all three vertices in the 1st quadrant.

  5. Use the “Line” tool to create three lines that each pass through the transformation origin and one of the vertices of the triangle.

  6. Use the “Enlarge from Point” tool to create a second triangle which is an enlargement of the first.
    1. Select the “Enlarge from Point” tool

    2. Click on the original triangle
    3. Select the enlargement origin
    4. Enter a scale factor of 2

  7. Measure the three internal angles of the first triangle

    1. Select the “Angle” tool

    2. Click within the first triangle – all three angles should be
      marked.

  8. Repeat the above steps to measure all three internal angles of
    the second triangle.

  9. Record your measurements in a table like the one below:

    Angle 1 Angle 2 Angle 3
    Triangle 1
    Triangle 2
  10. Measure the three sides of the first triangle

    1. Select the “Distance or Length” tool

    2. Select the two vertices at either end of the side

    3. Repeat for the other two sides

  11. Repeat the above steps for the second triangle.

  12. Record your measurements in a table like the one below. Include
    calculations of the ratios between side lengths for each of the two
    triangles.

    Side 1 Side 2 Side 3 Side 1 ÷
    Side 2
    Side 1 ÷
    Side 3
    Side 2 ÷
    Side 3
    Triangle 1
    Triangle 2
  13. Calculate the area of the first triangle using the “Area” tool

    1. Select the “Area” tool

    2. Click on the triangle

  14. Repeat for the second triangle.

  15. Insert your measurements of area in a table like the one
    below:

    Area
    Triangle 1
    Triangle 2
  16. Save your Geogebra file as “enlargement_transformation.ggb” using
    “Save” from the “File” menu.

  17. Export your enlargement diagram to a “PNG” file using
    “Export”->”Graphics View” from the “File” menu.

  18. With reference to your measurements in the three tables, comment
    on how the angles, side lengths, rations between sides, and area are
    affected by an enlargement transformation with a scale factor of
    2.

  19. Predict what will happen to the angles, side lengths, ratios
    between sides, and area, if the original triangle is enlarged by a scale
    factor of 3.

  20. Use Geogebra to test your prediction, include an exported image
    file as evidence.

  21. Summarise your findings with four hypotheses relating to the
    angles, side lengths, ratios between sides, and area of enlarged
    triangles with a scale factor of n.

Measurement Toolkit (part 3)

Surface area calculator

In this tutorial we describe how to add functionality for calculating the surface area of various shapes to the Measurement Toolkit. The screenshot below shows the tool being used to calculate the surface area of a rectangular prism.

Surface Area Calculator

The tool is designed so that we can easily extend it with functionality for calculating the surface area for additional 3d shapes. The main steps involved in adding a new shape to the surface area calculator are:

  1. Research the shape to determine an appropriate formula for calculating its surface area
  2. Design and implement test cases that will be run to check the correctness of calculations in the tool
  3. Code a function to calculate the surface area of the chosen shape
  4. Create an image file to represent the shape in the tool
  5. Link the calculation function and image to the main interface

In the following sections we will look at the process used to add cubes to the surface area calculator.
Given a cube with sides of length a, then the surface area is given by the following formula:
SA=6a^2
The formula is derived by noting that the cube has six faces of equal size. Each face is a square with dimensions of a by a units.

Designing test cases

The next step is design and implement test cases for calculating the surface area of a cube. These should be designed initially on paper before being added to surface area tester file.
For the first test case we consider a cube with sides of length 5 units:

SA=6\times 5^2=6 \times 25 = 150\mathrm{units^2}

For the second test case a side length of 3.275 units is selected. The resulting surface area is rounded to two decimal places:

SA=6\times 3.275^2 = 64.35375 \approx 64.35 \mathrm{units^2}

These test cases were then coded in the surface_area_tester.py file as shown below. The tester file imports the surface area file on line 2, which contains the surface area calculation functions. It is assumed that the function for calculating the surface area of a cube is called calc_cube_sa, which takes a single input representing the length of the cube edges. Because the expected answer for the second test case was rounded to 2 decimal places we use assertAlmostEqual which in this case checks that the value returned by the calc_cube_sa after rounding to 2 decimal places is equal to the expected answer of 64.35.

import unittest
from surface_area import *

class TestSurfaceArea(unittest.TestCase):
    def test_calc_cube_sa(self):
        self.assertEqual(calc_cube_sa(5),150)
        self.assertAlmostEqual(calc_cube_sa(3.275),64.35,2)

if __name__ == '__main__':
    unittest.main()

Note that in the code above we have placed two test cases within the same test function allowing us to group the tests together based on the shape being tested.

Coding the surface area calculation functions

Functions for calculating the surface area of different 3d shapes are include in the surface_area.py file. The following code listing shows the code for the calc_cube_sa function. The file also includes a code stub for calc_rprism_sa, which will be used to calculate the surface area of a rectangular prism.
The file imports the math package which will be used later for doing calculations involving the constant pi.

import math

def calc_cube_sa(length):
    return 6*(length)**2

def calc_rprism_sa(length,width,height):
    return 0

Functions for additional surface area calculations should be added after the given functions.

After the functions have been written they should be tested by running the test cases in surface_area_tester.py.

Creating 3d shapes

Images representing the different 3d shapes used in the surface area calculator tool need to be created and added to the Images directory.
The following link explains how to
create 3d shapes in Illustrator. Another option is to create the 3d shapes using Efofex Draw.

Linking the components in the main interface

The final step in creating and adding to the surface area functionality of the Measurement Toolkit is to incorporate the calculation functions and images in the main mathtoolkit.py file.

##
## ADD NEW SHAPES HERE FOR SURFACE AREA
##
sa_shapes['Cube']=[['l'],"Images/cube.png","calc_cube_sa"]
sa_shapes['Rectangular Prism']=[['l','w','h'],"Images/rect_prism.png","calc_rprism_sa"]

Line 4 shows the configuration for cube. The string inside the first pair of square brackets is the name of the shape as presented in the tool. After the equal symbol, the list of variables, the name of the image file, and finally the name of the calculation function are given.
Line 5 shows a similar configuration for rectangular prisms. In this case the user will be required to enter values for three variables representing the length, width and height respectively.

Measurement Toolkit (part 2)

Unit conversions

In the first step of the Measurement toolkit tutorial we downloaded the initial source code and installed the pillow package. In this step we will complete the functionality and testing for the unit conversion part of the tool. This will consist of conversions for metric units for length, area and volume.

Testing length conversions

We begin by considering conversions for metric units of length. The following diagram shows the process for converting between the four most widely used units (millimetres, centimetres, metres and kilometres).

Converting metric units of length


To perform a conversion we follow the arrows from the initial unit to the target unit, applying the operation attached to each arc.
Conversion calculations are firstly written by hand – these will then form the basis for test cases. For example, calculations for converting kilometres to millimetres are shown below.

1.2\mathrm{km}=1.2 \times 1000 = 1200\mathrm{m}
1200\mathrm{m} = 1200 \times 100 = 120000\mathrm{cm}
120000\mathrm{cm}=120000 \times 10 = 1200000\mathrm{mm}

Once calculations have been done to cover all of the metric length unit conversions they should be coded in the convert_units_tester.py file. The existing code for this is shown below. Test cases for converting from metres have already been included. The highlighted code (lines 6 and 7) contains a function to test whether the conversion from metres to millimetres is correct.
Each test case function begins with the keyword def followed by the name of the function, in this case test_m_to_mm, finally we include the input variable self in brackets followed by a colon. The first line of each test case function will the same except the function name will differ – ensure you give a meaningful name and make sure each function has a different name. The second line of the function contains the actual test case. The assertEqual function takes two arguments. The first argument on line 7 calls the convert_length_unit function and returns a result. The second argument contains the expected (correct) result. If the first argument equals the second argument then the test passes. Otherwise the test fails, indicating that we probably have an error in the code in the convert_length_unit in the file convert_units.py.

import unittest
from convert_units import *

class TestConvertUnits(unittest.TestCase):

    def test_m_to_mm(self):
        self.assertEqual(convert_length_unit(0.23,"m","mm"),230)
    def test_m_to_cm(self):
        self.assertEqual(convert_length_unit(0.25,"m","cm"),25)
    def test_m_to_m(self):
        self.assertEqual(convert_length_unit(178,"m","m"),178)
    def test_m_to_km(self):
        self.assertEqual(convert_length_unit(19000,"m","km"),19)

if __name__ == '__main__':
    unittest.main()

The tester code imports the code in convert_units.py on line 2, which contains the conversion functions. We will look at this file in more detail a little later. Before we do so we must complete the length unit conversion tests in convert_units_tester.py file.

For example, to add a test based on the kilometre to millimetre calculation shown earlier we would add the following code.

    def test_km_to_mm(self):
        self.assertEqual(convert_length_unit(1.2,"km","mm"),1200000)

This code would be included immediately after the previous test functions, making sure it is indented to the same level as the other test functions.
When the tester code is run it creates a report on how many tests passed or failed. The ultimate aim is obviously to pass all tests.
To ensure that all functionality is tested we should have at least one test case for each possible conversion, including conversions from a unit to itself (e.g. from metres to metres).
This means that you will need to write at least sixteen (16) length conversion tests.

When you run your length conversion tests you should get a number of failed tests – these represent errors in the convert_length_unit code. As mentioned the code for this function is given in the convert_units.py file and is listed below. Running the tests should help you identify the errors in the code. These should be corrected and tests should be rerun to ensure the function is free of errors.

def convert_length_unit(value,inunit, outunit):
    if (inunit==outunit):
        result=value
    elif (inunit=="m") & (outunit=="mm"):
        result=value*1000
    elif (inunit=="m") & (outunit=="cm"):
        result=value*10
    elif (inunit=="m") & (outunit=="km"):
        result=value*1000
    elif (inunit=="km") & (outunit=="mm"):
        result=value*1000000
    elif (inunit=="km") & (outunit=="cm"):
        result=value*10000
    elif (inunit=="km") & (outunit=="m"):
        result=value*1000
    elif (inunit=="cm") & (outunit=="mm"):
        result=value*100
    elif (inunit=="cm") & (outunit=="m"):
        result=value/100
    elif (inunit=="cm") & (outunit=="km"):
        result=value/100*1000
    elif (inunit=="mm") & (outunit=="cm"):
        result=value/10
    elif (inunit=="mm") & (outunit=="m"):
        result=value/1000
    elif (inunit=="mm") & (outunit=="km"):
        result=value/1000*1000
    return result

The function takes three input arguments, the first is the numerical value to be converted, the second is the original units of the measurement, and the third is the target units of the measurement. The function is implemented using a nested if-then-else statement. At the end of the function the converted measurement is returned as the result.

Area conversions

The next step is to develop the area unit conversions.
If you are doing this part of the development in pairs, then one person should design and develop the test cases in convert_units_tester.py, while the second person writes the area conversion function in convert_units.py

The diagram below shows the conversion process for units of area.

Area unit conversions

For example, consider the following conversion calculation:
5.8\mathrm{m^2} = 5.8 \times 100^2= 58000 \mathrm{cm^2}
58000\mathrm{cm^2}=58000 \times 10^2 = 5800000 \mathrm{mm^2}

This process can be repeated on paper to design test cases for each of the 16 possible area conversions (remember we need to include tests that check that conversions for a unit to itself leave the value unchanged). Once the test cases have been calculated on paper they can be added to the convert_units_tester.py file. The should be added immediately after the length unit test functions. For example, the test case calculated above would be written as:

    def test_m2_to_mm2(self):
        self.assertEqual(convert_area_unit(5.8, "m2", "mm2"), 5800000)

Notice that the test function name indicates that units of area are being converted – don’t forget to include the correct units in the function name. The test is implemented by calling the assertEqual function. This in turn calls convert_area_unit which takes three arguments – the original area measurement, the original units of area and the target units of area. The units of area include a 2 at the end to distinguish them from units of length.

The last step in the process is to write the code for the convert_area_unit function, contained in the
convert_units.py file. In the supplied code this function is written as a code stub, meaning that the function is defined, but it is not implemented correctly. In this case the function stub returns 0 regardless of the inputs to the function as shown below.

def convert_area_unit(value,inunit,outunit):
    return 0

The second line of the function needs to be replaced by code similar to that given for the convert_length_unit function, remembering though that the units of area will all need to include a 2 at the end. To implement this function, you should use the earlier area conversion diagram as a guide.

Once the code for the convert_area_unit function has been written, then you should test it by running the test cases in convert_units_tester.py.

Volume conversions

The last step in completing the unit conversions for the Measurement toolkit is to add volume conversions. As with the area conversions, if you are working in pairs one person should work on designing and implementing the test cases, while the other person develops the conversion code. For this task however you should swap roles.

Volume conversions

The calculations for an example conversion is shown below:
19500000\mathrm{mm^3}=19500000 \div 10^3 = 19500 \mathrm{cm^3}
19500\mathrm{cm^3} = 19500 \div 100^3 = 0.0195 \mathrm{m^3}

Calculations should be completed for all 16 possible conversions. These test cases should then be implemented in the convert_units_tester.py file.
The conversion functionality is added to the tool by implementing the following code stub in
the convert_units.py file, replacing the second line with appropriate code.

def convert_volume_unit(value,inunit,outunit):
    return 0

Measurement Toolkit (part 1)

Introduction

In this series of tutorials we explain how to develop a Measurement toolkit which provides functions for converting units of measurement and calculating the surface area and volume of a range of 3d shapes.

A screenshot showing the Measurement toolkit is given below showing the unit conversion capabilities of the tool.

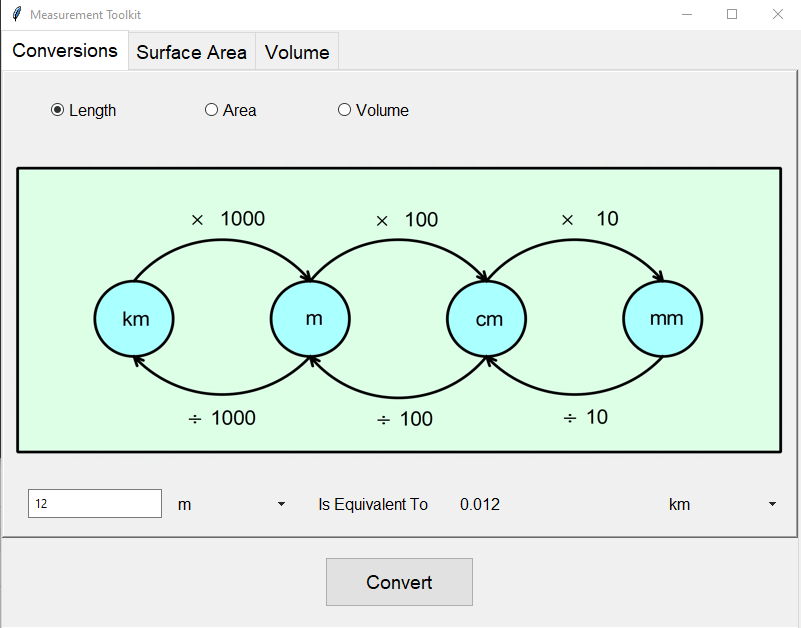
Unit conversions in the Measurement Toolkit

Initial setup

The starting point for the development of the Measurement Toolkit is to download the initial source code files for the Measurement Toolkit. This zip file should be downloaded and extracted to a suitable location. These files provide the basic skeletal code for the application. It includes graphical user interface (GUI) code, together with stubs for the functions that do the conversions and calculations.

The files are listed below, with full code listings that can be expanded and view. We will describe each of these files in more detail in later parts of this tutorial as required.

  • convert_units.py – will contain functions for carrying out unit conversions. Code is provided in this file for converting units of length, however several errors have been included which need to be found through testing and fixed. Stubs (incomplete functions) for converting area and volume units are also given.
  • def convert_length_unit(value,inunit, outunit):
        if (inunit==outunit):
            result=value
        elif (inunit=="m") & (outunit=="mm"):
            result=value*1000
        elif (inunit=="m") & (outunit=="cm"):
            result=value*10
        elif (inunit=="m") & (outunit=="km"):
            result=value*1000
        elif (inunit=="km") & (outunit=="mm"):
            result=value*1000000
        elif (inunit=="km") & (outunit=="cm"):
            result=value*10000
        elif (inunit=="km") & (outunit=="m"):
            result=value*1000
        elif (inunit=="cm") & (outunit=="mm"):
            result=value*100
        elif (inunit=="cm") & (outunit=="m"):
            result=value/100
        elif (inunit=="cm") & (outunit=="km"):
            result=value/100*1000
        elif (inunit=="mm") & (outunit=="cm"):
            result=value/10
        elif (inunit=="mm") & (outunit=="m"):
            result=value/1000
        elif (inunit=="mm") & (outunit=="km"):
            result=value/1000*1000
        return result
    
    def convert_area_unit(value,inunit,outunit):
        return 0
    
    def convert_volume_unit(value,inunit,outunit):
        return 0
    
  • convert_units_tester.py – will contain test cases to check the correctness of the unit conversion functions. Test cases have been written for converting from metres to other units. Using the same syntax you will be required to complete the other test cases.
  • import unittest
    from convert_units import *
    
    class TestConvertUnits(unittest.TestCase):
    
        def test_m_to_mm(self):
            self.assertEqual(convert_length_unit(0.23,"m","mm"),230)
        def test_m_to_cm(self):
            self.assertEqual(convert_length_unit(0.25,"m","cm"),25)
        def test_m_to_m(self):
            self.assertEqual(convert_length_unit(178,"m","m"),178)
        def test_m_to_km(self):
            self.assertEqual(convert_length_unit(19000,"m","km"),19)
    
    if __name__ == '__main__':
        unittest.main()
    
  • mathtoolkit.py – the main program file, containing of the GUI code and user configurable code allowing additional shapes to be added to the surface area and volume calculator parts of the tool
  • from tkinter import *
    from tkinter import ttk
    from convert_units import *
    from surface_area import *
    from volume import *
    from PIL import Image,ImageTk
    import math
    
    
    def convert_units_and_display():
        if (unitsvar.get()==1):
            converted=convert_length_unit(float(unitval.get()),funitvar.get(),tunitvar.get())
        elif (unitsvar.get()==2):
            converted=convert_area_unit(float(unitval.get()),funitvar.get(),tunitvar.get())
        elif (unitsvar.get()==3):
            converted=convert_volume_unit(float(unitval.get()),funitvar.get(),tunitvar.get())
        convertedval.set(str(converted))
        
    def change_unit_options():
        m1=foptnmenu['menu']
        m1.delete(0,END)
        m2=toptnmenu['menu']
        m2.delete(0,END)
        
        if (unitsvar.get()==2):
            newvalues=['mm2','cm2','m2','km2']
            funitvar.set("m2")
            tunitvar.set("m2")
            image=Image.open("Images/area_convert.png").resize((780,300))
            img=ImageTk.PhotoImage(image)
            cimage_label.configure(image=img)
            cimage_label.image=img
    
        elif(unitsvar.get()==3):
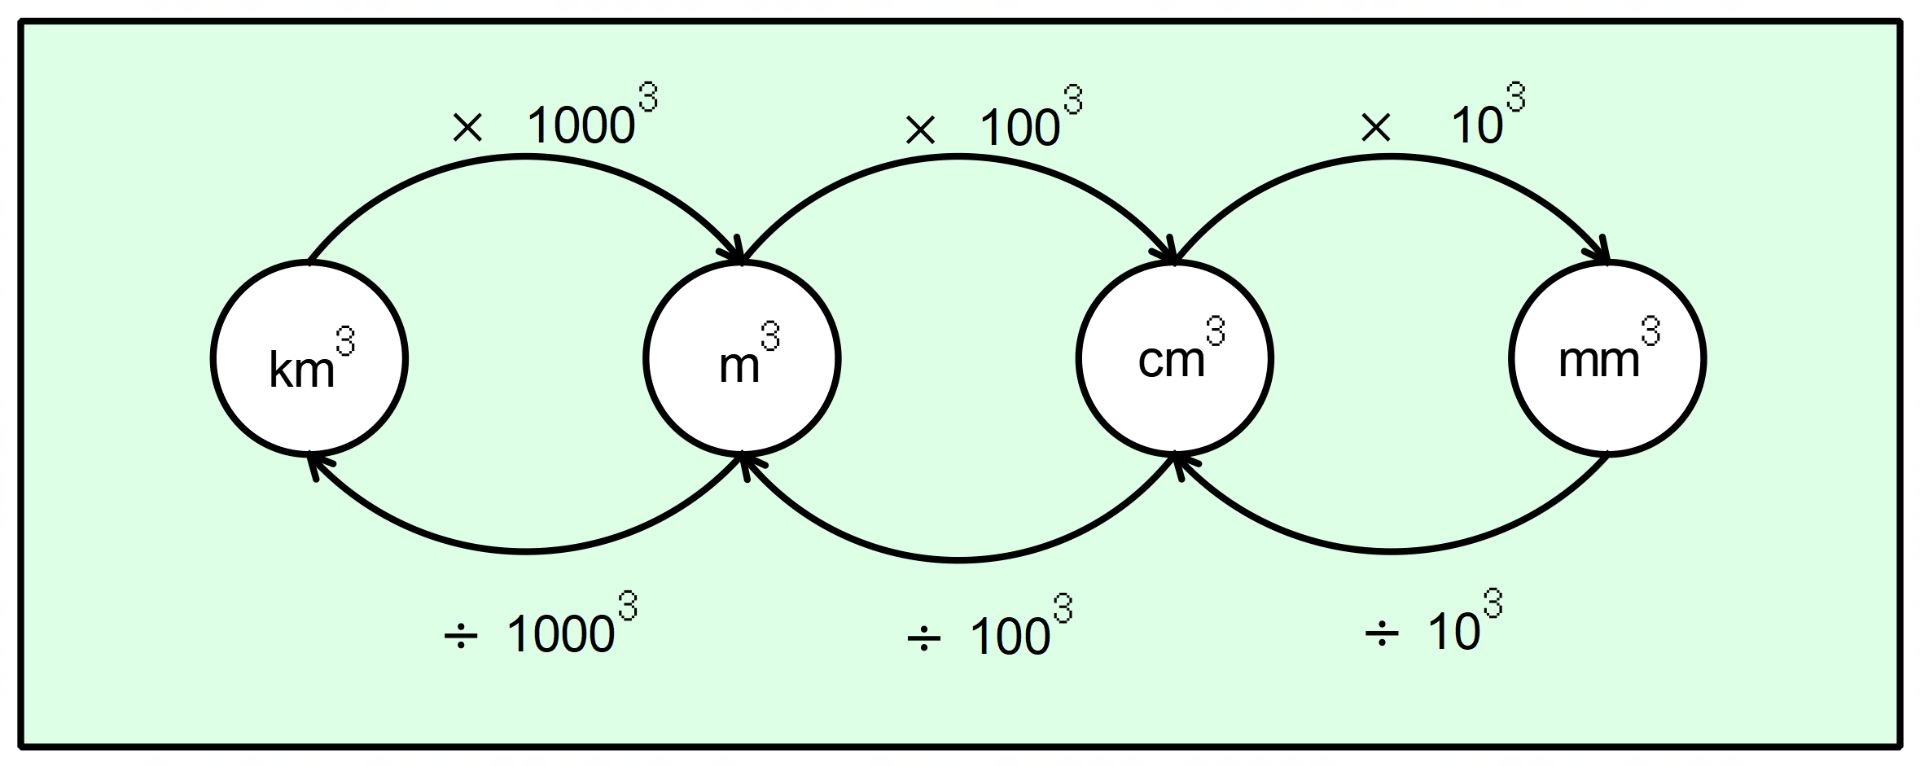
            newvalues=['mm3','cm3','m3','km3']
            funitvar.set("m3")
            tunitvar.set("m3")
            image=Image.open("Images/volume_convert.png").resize((780,300))
            img=ImageTk.PhotoImage(image)
            cimage_label.configure(image=img)
            cimage_label.image=img
        else:
            newvalues=['mm','cm','m','km']
            funitvar.set("m")
            tunitvar.set("m")
            image=Image.open("Images/length_convert.png").resize((780,300))
            img=ImageTk.PhotoImage(image)
            cimage_label.configure(image=img)
            cimage_label.image=img
    
        
        for val in newvalues:
            m1.add_command(label=val,command=lambda v=funitvar,l=val:funitvar.set(l))
            m2.add_command(label=val,command=lambda v=tunitvar,l=val:tunitvar.set(l))
    
    
    def display_shape_sa(self):
        sproperties=sa_shapes[shapevar.get()]
        refresh_surface_area(sproperties[0],
                             sproperties[1])
        
    
    def calc_surface_area():
        arglist=""
        for i in range(0,len(valarray)-1):
            arglist=arglist+"{0},".format(valarray[i].get())
        arglist=arglist+"{0}".format(valarray[len(valarray)-1].get())
        answer=(eval(sa_shapes[shapevar.get()][2]+"("+arglist+")"))
        sa_text.set("Surface Area of {0} is {1:.2f} units^2".format(shapevar.get(),answer))


    def refresh_surface_area(varlist,imageloc):
        valarray.clear()
        for l in range(0,len(varlabels)):
            varlabels[l].destroy()
        for l in range(0,len(varentries)):
            varentries[l].destroy()
        for i in range(0,len(varlist)):
            valarray.append(StringVar(main))
            lab=ttk.Label(vframe,text="{0}=".format(varlist[i]))
            lab.grid(row=i+1,column=0,pady=20,sticky=W)
            varlabels.append(lab)
            entry=ttk.Entry(vframe,width=20,textvariable=valarray[i])
            entry.grid(row=i+1,column=1,sticky=W)
            varentries.append(entry)
        image=Image.open(imageloc).resize((400,400))
        img=ImageTk.PhotoImage(image)
        image_label.configure(image=img)
        image_label.image=img
    
    def display_shape_vol(self):
        vproperties=vol_shapes[vshapevar.get()]
        refresh_volume(vproperties[0],
                        vproperties[1])
        
    
    def calc_volume():
        arglist=""
        for i in range(0,len(vvalarray)-1):
            arglist=arglist+"{0},".format(vvalarray[i].get())
        arglist=arglist+"{0}".format(vvalarray[len(vvalarray)-1].get())
        answer=(eval(vol_shapes[vshapevar.get()][2]+"("+arglist+")"))
        vol_text.set("Volume of {0} is {1:.2f} units^3".format(vshapevar.get(),answer))


    def refresh_volume(varlist,imageloc):
        vvalarray.clear()
        for l in range(0,len(vvarlabels)):
            vvarlabels[l].destroy()
        for l in range(0,len(vvarentries)):
            vvarentries[l].destroy()
        for i in range(0,len(varlist)):
            vvalarray.append(StringVar(main))
            lab=ttk.Label(vframe2,text="{0}=".format(varlist[i]))
            lab.grid(row=i+1,column=1,pady=20)
            vvarlabels.append(lab)
            entry=ttk.Entry(vframe2,width=20,textvariable=vvalarray[i])
            entry.grid(row=i+1,column=2)
            vvarentries.append(entry)
        image=Image.open(imageloc).resize((400,400))
        img=ImageTk.PhotoImage(image)
        vimage_label.configure(image=img)
        vimage_label.image=img
    ####################
    ## Top level GUI setup
    ######################
    
    main=Tk()
    main.title('Measurement Toolkit')
    main.geometry('800x600')
    rows=0
    
    main.grid_rowconfigure(0, weight=1)
    main.grid_columnconfigure(0, weight=1)
    
    style = ttk.Style(main)
    style.configure('TRadiobutton', font=('Helvetica', 12))
    style.configure('TNotebook.Tab', font=('Helvetica', 14), padding=5)
    style.configure('TButton', font=('Helvetica', 14), padding=10)
    style.configure('TLabel', font=('Helvetica', 12))
    style.configure('TEntry', font=('Helvetica', 12), padding=5)
    style.configure('TMenubutton', font=('Helvetica', 12), padding=5)
    
    nb=ttk.Notebook(main)


    nb.grid(row=0,sticky="nesw")


    page1=ttk.Frame(nb)
    nb.add(page1,text='Conversions')
    page2=ttk.Frame(nb)
    nb.add(page2,text='Surface Area')
    page3=ttk.Frame(nb)
    nb.add(page3,text='Volume')
    
    ##################
    ## Conversions
    ###################
    page1.rowconfigure(0,weight=2)
    page1.rowconfigure(1,weight=1)
    page1.columnconfigure(0,weight=1,uniform=1)
    unitsvar=IntVar()
    unitsvar.set(1)
    
    
    cframe=ttk.Frame(page1,relief=RAISED,padding=5)
    cframe.grid(row=0,column=0,sticky="nesw")
    cframe.columnconfigure((0,1,2,3,4),weight=1)
    cframe.rowconfigure(1,weight=1)
    cframe.rowconfigure((0,2),weight=1)
    
    
    cimage_label=ttk.Label(cframe)
    cimage_label.grid(row=1,column=0,columnspan=5,sticky="ew")
    image=Image.open("Images/length_convert.png").resize((780,300))
    img=ImageTk.PhotoImage(image)
    cimage_label.configure(image=img)
    cimage_label.image=img
    
    ttk.Radiobutton(cframe,text="Length",variable=unitsvar,value=1,command=change_unit_options).grid(row=0,column=0,pady=10)
    ttk.Radiobutton(cframe,text="Area",variable=unitsvar,value=2,command=change_unit_options).grid(row=0,column=1,pady=10)
    ttk.Radiobutton(cframe,text="Volume",variable=unitsvar,value=3,command=change_unit_options).grid(row=0,column=2,pady=10)
    
    funitvar=StringVar(main)
    tunitvar=StringVar(main)
    unitchoices=['mm','cm','m','km']


    unitval=StringVar(main)
    unitval.set("0")
    convertedval=StringVar(main)
    convertedval.set("0")
    ttk.Label(cframe,text='Is Equivalent To').grid(row=2,column=2,padx=5,pady=5)
    uentry=ttk.Entry(cframe,width=20,textvariable=unitval)
    uentry.grid(row=2,column=0,sticky='E')
    foptnmenu=ttk.OptionMenu(cframe,funitvar,'m',*unitchoices)
    foptnmenu.configure(width=10)
    foptnmenu.grid(row=2,column=1)
    convertLabel=ttk.Label(cframe,textvariable=convertedval,width=20)
    convertLabel.grid(row=2,column=3)
    toptnmenu=ttk.OptionMenu(cframe,tunitvar,'m',*unitchoices)
    toptnmenu.configure(width=10)
    toptnmenu.grid(row=2,column=4)
    convertButton=ttk.Button(page1,text="Convert",
                         command=convert_units_and_display)
    convertButton.grid(row=1,column=0)
    
    #################
    ## Surface Area
    ###################
    sa_shapes={}
    
    ##
    ## ADD NEW SHAPES HERE FOR SURFACE AREA
    ##
    sa_shapes['Cube']=[['l'],"Images/cube.png","calc_cube_sa"]
    sa_shapes['Rectangular Prism']=[['l','w','h'],"Images/rect_prism.png","calc_rprism_sa"]


    ##
    ## DO NOT EDIT BELOW HERE
    ##
    
    page2.rowconfigure(0,weight=1)
    page2.rowconfigure(1,weight=1)
    page2.rowconfigure(2,weight=1)
    page2.rowconfigure(3,weight=1)
    page2.columnconfigure(0,weight=1,uniform=1)
    
    shapechoices=sa_shapes.keys()
    shapevar=StringVar(main)
    shapevar.set('Cube')
    
    shapeoptnmenu=ttk.OptionMenu(page2,shapevar,"Cube",*shapechoices,command=display_shape_sa)
    shapeoptnmenu.configure(width=30)
    shapeoptnmenu.grid(row=0,column=0,sticky=W)
    vframe=ttk.Frame(page2,relief=RAISED,padding=10)
    vframe.grid(row=1,column=0,sticky=NSEW)


    ttk.Label(vframe,text="Variables").grid(row=0,column=1,padx=20)
    iframe=ttk.Frame(page2,relief=RAISED,padding=5)
    iframe.grid(row=1,column=1,sticky=NSEW)
    valarray=[]
    varlabels=[]
    varentries=[]
    image_label=ttk.Label(iframe,background='white')
    image_label.grid(row=0,column=0)
    display_shape_sa(main)
    
    
    sa_text=StringVar()
    sa_text.set("Press Calculate button")
    ttk.Label(page2,textvariable=sa_text).grid(row=2,column=0, columnspan=2, sticky=W)
    ttk.Button(page2,text="Calculate",command=calc_surface_area).grid(row=3,column=0,columnspan=2)
    
    
    ################
    ## Volume
    ################
    vol_shapes={}
    ##
    ## ADD NEW SHAPES HERE FOR VOLUME
    ##
    vol_shapes['Cube']=[['l'],"Images/cube.png","calc_cube_vol"]
    vol_shapes['Rectangular Prism']=[['l','w','h'],"Images/rect_prism.png","calc_rprism_vol"]
    
    ##
    ## DO NOT EDIT BELOW HERE
    ##
    page3.rowconfigure(0,weight=1)
    page3.rowconfigure(1,weight=1)
    page3.rowconfigure(2,weight=1)
    page3.rowconfigure(3,weight=1)
    page3.columnconfigure(0,weight=1,uniform=1)
    vshapechoices=vol_shapes.keys()
    vshapevar=StringVar(main)
    vshapevar.set('Cube')
    
    vshapeoptnmenu=ttk.OptionMenu(page3,vshapevar,"Cube",*vshapechoices,command=display_shape_vol)
    vshapeoptnmenu.configure(width=30)
    vshapeoptnmenu.grid(row=0,column=0,sticky=W)
    vframe2=ttk.Frame(page3,relief=RAISED)
    vframe2.grid(row=1,column=0,sticky=NSEW)
    
    ttk.Label(vframe2,text="Variables").grid(row=0,column=1,columnspan=2,padx=20)
    iframe2=ttk.Frame(page3,relief=RAISED,padding=5)
    iframe2.grid(row=1,column=1,sticky=NSEW)
    vvalarray=[]
    vvarlabels=[]
    vvarentries=[]
    vimage_label=ttk.Label(iframe2,background='white')
    vimage_label.grid(row=0,column=0)
    display_shape_vol(main)
    
    vol_text=StringVar()
    vol_text.set("Press Calculate button")
    ttk.Label(page3,textvariable=vol_text).grid(row=2,column=0, columnspan=2, sticky=W)
    ttk.Button(page3,text="Calculate",command=calc_volume).grid(row=3,column=0,columnspan=2)
    
    main.mainloop()
    
  • surface_area.py – will contain the functions for calculating the surface area of various 3d shapes
  • import math
    
    def calc_cube_sa(length):
        return 6*(length)**2
    
    def calc_rprism_sa(length,width,height):
        return 0
    
  • surface_area_tester.py – will contain test cases to check the correctness of the surface area calculation functions
  • import unittest
    from surface_area import *
    
    class TestSurfaceArea(unittest.TestCase):
        def test_calc_cube_sa(self):
            self.assertEqual(calc_cube_sa(5),150)
            self.assertAlmostEqual(calc_cube_sa(3.275),64.35,2)
    
    if __name__ == '__main__':
        unittest.main()
    
  • volume.py – will contain the functions for calculating the volume of various 3d shapes
  • import math
    
    def calc_cube_vol(l):
        return l**3
    
    def calc_rprism_vol(l,w,h):
        return 0
    
  • volume_tester.py – will contain test cases to check the correctness of the volume calculation functions
  • import unittest
    from volume import *
    
    class TestVolume(unittest.TestCase):
        def test_calc_cube_vol(self):
            self.assertEqual(calc_cube_vol(5),125)
    
    if __name__ == '__main__':
        unittest.main()
    
  • Images – stores the image files that will be used to represent the 3d shapes, together with the unit conversion diagrams

To run the program you will also need to install the pillow package in Python using the following command:

pip install pillow pip --trusted-host pypi.org --trusted-host files.pythonhosted.org

Developing a text-based adventure (part 5)

Dictionaries

Dictionaries are a data structure that allow us to store related information in our game. For example we might use a dictionary to represent the attributes of the player character. Or a dictionary might be used to store the different monsters that could be encountered in the game.

Character creation

To demonstrate the use of dictionaries in a text-based adventure game we will do a walkthrough of character creation code.

The first step in character creation is to give the character a name. This name is entered with an input statement. The character name is then stored in the playerAttributes dictionary.

import random

playerAttributes={}

response=input("What is your name brave adventurer? ")
playerAttributes["name"]=response

After the player selects their character name, they need to select the character class, which can either be a fighter, wizard or healer. The character class is stored in the playerAttributes dictionary using the “class” key.
To ensure that the player selects a valid option the code is enclosed in a loop. The loop will continue until a valid response is entered as input. A Boolean-valued variable, called validResp, is used to keep track of whether or not a valid response has been entered.

validResp=False
while (not validResp):
    response=input("You may play as a [F]ighter, [W]izard or [H]ealer > ")

    if (response.upper()=="F"):
        playerAttributes["class"]="fighter"
        validResp=True
    elif (response.upper()=="W"):
        playerAttributes["class"]="wizard"
        validResp=True
    elif (response.upper()=="H"):
        playerAttributes["class"]="healer"
        validResp=True
    else:
        print("This is not a valid option")

Next the program sets the character’s health points which are initialised using a random number generator. The random module is imported at the beginning of the code listing. In this case we use the randint function, which generates a random integer (whole number) between the given lower and upper bounds. Two new attributes are added to the player attributes dictionary, the first representing the maximum number of health points (i.e. when the character is in full health), the second representing the current number of health points.

playerAttributes["hpsMax"]=random.randint(20,30)
playerAttributes["hpsCurrent"]=playerAttributes["hpsMax"]

The next part of the code listing sets up class specific attributes. Fighters have might points which can be used to perform special attacks in close combat. Wizards have power points which can be used to cast spells. Healers have salvation points which can be used to heal the player or to create protective wards. For each of the class specific attributes attributes are initialised for the maximum number of points and the current number of points.

if (playerAttributes["class"]=="fighter"):
    playerAttributes["mightMax"]=random.randint(20,40)
    playerAttributes["mightCurrent"]=playerAttributes["mightMax"]
elif (playerAttributes["class"]=="wizard"):
    playerAttributes["powerMax"]=random.randint(20,40)
    playerAttributes["powerCurrent"]=playerAttributes["powerMax"]
elif (playerAttributes["class"]=="healer"):
    playerAttributes["salvationMax"]=random.randint(20,40)
    playerAttributes["salvationCurrent"]=playerAttributes["salvationMax"]

The final part of the code listing defines a function for printing out the player attributes. The attributes are printed within a box, which is created using special box drawing Unicode characters. Note that the box characters will not display correctly in the IDLE environment – you will need to run your program within a Python shell – you can double click on the file in Windows Explorer to run the program. A for loop is used to print out each of the individual key/value pairs in the dictionary. This will print the pairs in the order they have been added to the dictionary. The upper function has been used to convert the attribute keys to all upper case characters.

def printPlayerAttributes():
    print("\u250F"+"\u2501"*18+"\u2533"+"\u2501"*20+"\u2513")
    for k,v in playerAttributes.items():
        print("\u2503{0:<18}\u2503{1:<20}\u2503".format(k.upper(),v))
    print("\u2517"+"\u2501"*18+"\u253B"+"\u2501"*20+"\u251B")  

printPlayerAttributes()

Output from the final code is shown in the image below.

Presenting dictionary attributes inside a box

Developing a text-based adventure game (Part 4)

Developing a battle system

In this tutorial we will look at the development of a simple battle system. We restrict our attention to a one-on-one battle.
We will implement a Dungeons and Dragons like battle system, where the player and the monster they are facing have a number of hitpoints. The player and monster will take it in turns to attack the other entity. Each attack causes damage that reduces the hitpoints of the entity that was hit. The damage caused by an attack will be randomly determined, but must lie between a predetermined minimum and maximum damage. The battle ends when the hitpoints of either the player or monster are reduced to zero or below.

Initial implementation

The battle mechanics will be encapsulated within the battle function.
The function takes seven inputs. The first three inputs are used for player information, describing the number of hitpoints that they had at the beginning of the combat, the minimum damage that one of their attacks does, and the maximum damage done by their attack. The remaining inputs are used for the title/name of the monster, the monster’s hitpoints and the minimum and maximum damage done by their attack.

The code for the battle mechanics is shown below. The battle function is tested by calling the function at the end of the code listing.

import random

def battle(hitpoints, minDamage, maxDamage,
           monsterTitle, monsterHitpoints,
           monsterMinDamage, monsterMaxDamage):
    playerAttack=True
    while (hitpoints>0 and monsterHitpoints>0):
        if (playerAttack):
            damage=random.randint(minDamage, maxDamage)
            monsterHitpoints=monsterHitpoints-damage
            print("You did {0:d} hitpoints damage".format(damage))
            if (monsterHitpoints <= 0):
                print("The {0} is dead".format(monsterTitle))
            playerAttack=False
        else:
            damage=random.randint(monsterMinDamage, monsterMaxDamage)
            hitpoints=hitpoints-damage
            print("You took {0:d} hitpoints damage".format(damage))
            if (hitpoints <= 0):
                print("You have been killed".format(monsterTitle))
            playerAttack=True

battle(20, 1, 8, "Ogre", 25, 1, 12)

Download source code [Battle mechanics (version 1)].

To randomise the amount of damage done we need to import the random module. From this module we use the randint function, which generates a random integer between the lower and upper bounds which are passed as inputs to the function. To keep track of whether it is the player’s turn or the monster’s turn we use a boolean-valued variable called playerAttack (line 6). This variable can be set to either true or false. A while loop is used to provide a sequence of attacks that continue until either the player or monster is reduced to zero or less hitpoints (line 7). Lines 8-14 of the code implement the player’s attack. The randint function is used to determine the amount of damage done, this is then subtracted from the monster’s hitpoints. If the monster’s hitpoints are reduced below zero, then the monster is declared dead. Lines 15-21 use a similar sequence of code to implement the monster’s attack. The boolean-valued playerAttack variable is updated after each attack to ensure that the player and monster have alternate attacks.

Determining if attacks hit

In the first version of the battle mechanics code all attacks hit. However it is more realistic that only some attacks hit – the attacker may have just swung wildly and missed their target, or the defender may have managed to dodge the attack, or perhaps even parry the attack with their shield. The improve the battle mechanics we adapt the code so that only some of the attacks hit their target. In the code shown below we assume that the player has a 50% chance of hitting their opponent, while the monster only has a 25% chance of hitting.

def battle(hitpoints, minDamage, maxDamage,
           monsterTitle, monsterHitpoints,
           monsterMinDamage, monsterMaxDamage):
    playerAttack=True
    while (hitpoints>0 and monsterHitpoints>0):
        if (playerAttack):
            hitRoll=random.randint(1,20)
            if (hitRoll>=11):
                damage=random.randint(minDamage, maxDamage)
                monsterHitpoints=monsterHitpoints-damage
                print("You hit!")
                print("You did {0:d} hitpoints damage".format(damage))
                if (monsterHitpoints <= 0):
                    print("The {0} is dead".format(monsterTitle))
            else:
                print("You missed")
            playerAttack=False
        else:
            hitRoll=random.randint(1,20)
            if (hitRoll>=16):
                damage=random.randint(monsterMinDamage, monsterMaxDamage)
                hitpoints=hitpoints-damage
                print("{0} hit".format(monsterTitle))
                print("You took {0:d} hitpoints damage".format(damage))
                if (hitpoints <= 0):
                    print("You have been killed".format(monsterTitle))
            else:
                print("{0} missed".format(monsterTitle))
            playerAttack=True

Download source code [Battle mechanics (version 2)].

Lines 7 and 8 of the above code are used to determine whether or not the player hits the monster. A random integer between 1 and 20 is generated and if this number if 11 or larger the player hits the monster, otherwise the attack results in a miss. Similar code is given on lines 19-20 to determine whether or not the monster hits.

Improvements

We improve the code by firstly generalising the hit chances of the player and monster by adding these as variables. We also add a return statement at the end of the code showing how many hitpoints the player has at the end of the battle. This will be used when we call the function in the game to keep track of the ongoing health of the player as well as to determine whether or not the game continues.

def battle(hitpoints, minDamage, maxDamage, toHit,
           monsterTitle, monsterHitpoints,
           monsterMinDamage, monsterMaxDamage, monsterToHit):
    playerAttack=True
    while (hitpoints>0 and monsterHitpoints>0):
        if (playerAttack):
            hitRoll=random.randint(1,20)
            if (hitRoll>=toHit):
                damage=random.randint(minDamage, maxDamage)
                monsterHitpoints=monsterHitpoints-damage
                print("You hit!")
                print("You did {0:d} hitpoints damage".format(damage))
                if (monsterHitpoints <= 0):
                    print("The {0} is dead".format(monsterTitle))
            else:
                print("You missed")
            playerAttack=False
        else:
            hitRoll=random.randint(1,20)
            if (hitRoll>=monsterToHit):
                damage=random.randint(monsterMinDamage, monsterMaxDamage)
                hitpoints=hitpoints-damage
                print("{0} hit".format(monsterTitle))
                print("You took {0:d} hitpoints damage".format(damage))
                if (hitpoints <= 0):
                    print("You have been killed".format(monsterTitle))
            else:
                print("{0} missed".format(monsterTitle))
            playerAttack=True
    return hitpoints

Testing the balance of the battle mechanics

Before we add the battle mechanics to the game we need to test it to make sure it has the right balance. We don’t want to always die when they battle a monster, but at the same time the monster should not be a pushover. Furthermore, if the player acquires an item that is supposed to give them an edge in combat then it should indeed give them and edge. To test the battle function we need to call it many times and then analyse the number of player wins versus the number of player losses. The best way to do this to use a for loop as shown in the code below.

wins=0
for i in range(0,1000):
    hps=battle(20, 1, 8, 11, "Ogre", 25, 1, 12, 16)
    if (hps>0):
        wins=wins+1

print(wins)

In this case the player has 20 hitpoints and a to-hit-roll of 11 (meaning they will need at least an 11 on a roll between 1 and 20 to hit). The monster has 25 hitpoints, does more damage, but is only half as likely to hit. Running the battle mechanics 1000 times with the given configuration results in the player winning 60.5% of the battles. This is probably too high in the situation when the player has not found the sword, but too low if they have found the sword. This suggests we need to adjust the player statistics for these two scenarios. We will use trial an error to get a 20% win chance if they don’t have the sword and an 80% win chance if they do have the sword.

Modifying the player’s damage to 1-4 hps and increase the to-hit-roll to 12 gives the player a win percentage of approximately 20%. On the other hand, if we change the player’s damage to 4-10 and decrease the to-hit-roll to 11, the player will have a win percentage of 79%.

Integrating battle mechanics into the game

To integrate the battle mechanics into the game we modify the playLocation3 function. When the player selects the attack option, the code will call the battle function. The values passed to the battle function depend on whether or not the player has picked up the sword earlier in the game, remembering that possessing the sword gives the player a much better chance of defeating the Ogre (compare lines 20 and 23).

def playLocation3():
    global inventory
    print("You reach what looks like a rudimentary camp site.")
    print("You notice a fire pit in the middle of the camp site.")
    print("Scattered around the fire pit are the many bones picked clean of flesh.")
    print("Ominously some of the bones look human like.")
    print("Just as you finish surveying the scene you here a roar.")
    print("Running towards you, wielding a large club is an Ogre.")
    print("You can either (f)lee to the south, (a)ttack the Ogre or try to (t)alk with the Ogre.")
    response=input("> ")
    if (response=="f"):
        print("You run away from the Ogre at full speed")
        print("The Ogre pursues for a while but eventually gives up.")
        print("You survive another day.")
        print("Once you know you are safe you continue your journey southward at a slower pace.")
        location="location1"
    elif (response=="a"):
        if ("sword" in inventory):
            print("As the Ogre draws near you draw your sword.")
            hps=battle(20, 4, 10, 11, "Ogre", 25, 1, 12, 16)
        else:
            print("You pick up a fallen branch from the ground and prepare to battle the Ogre")
            hps=battle(20, 1, 4, 12, "Ogre", 25, 1, 12, 16)
        if (hps >0):
            print("You have felled the evil beast.")
            print("You search the body of the Ogre and find a key.")
            print("You take the key and head back towards the clearing with the chest.")
            location="location1"
            inventory.append("key")
        else:
            print("You fight valiantly with the Ogre.")
            print("You manage to inflict several telling blows against it but it fights on.")
            print("Having dodged several sweeping blows, the Ogre brings its club down upon you with a crash.")
            print("...")
            location="finish"    
    elif (response=="t"):
        print("You attempt to make conversation with the Ogre but this only makes it more angry.")
        location="location3"
    else:
        location="location3"
    return location

Download source code [Stage 4 code]

Developing a text-based adventure game (Part 3)

Implementing an inventory system

In this tutorial we will look at how a simple inventory system can be added to the game. We will then use the contents of the inventory to differentiate between different outcomes for certain events. In particular, possessing the sword from location 2 will allow the player to slay the Ogre, which will in turn allow them to collect the key to the chest in location 1.

Modelling the inventory using a list

We will use a list in Python to represent the player’s inventory. A list represents an ordered collection of items. A variety of operations can be performed on lists, including adding elements to a list, removing elements from a list, determine the size of a list, and checking whether an item is contained in a list. The basic list operations are demonstrated in the following code listing.

New lists are defined within a pair of square brackets. Individual elements of the list are separated by commas.

#define a new list
list1=['a', 'b', 'c']
print(list1)

The number of elements in a list is calculated using the len operator.

#the number of elements in a list
print(len(list1))

To check whether an element is in a list we use the in operator. Because ‘a’ is in list1 the first use of the in operator returns true. The second use of the in operator return false. We will use the in operator later to check whether or not an item is in the player’s inventory.

#check whether elements are in a list
print('a' in list1)
print('d' in list1)

New elements are added to a list using the append operator. Note the usage of the append operation – the name of the variable storing the list is given first, followed by a period, followed by the append operator. The append operator takes a single argument, corresponding to the element to be added, enclosed in brackets. This operator can be used to add new items to the inventory.

#add an element to a list
list1.append('d')
print(list1)
print('d' in list1)

Elements can be removed from a list using the remove operator. The remove operator follows the same syntax as the append operator. The remove operator can be used to remove one time use items from the inventory. An example would be removing a potion once it has been consumed.

#remove an element from a list
list1.remove('a')
print(list1)

The following lines of code demonstrate further the use of the remove operator. It shows that if an element occurs multiple times in a list, then the remove operator only removes the first occurrence of the element. Note that if we attempt to remove an element that does not exist in the list then an error will occur. It is therefore important to test whether the element is present before attempting to remove it.

#remove only removes the first occurrence of an item from the list
list2=['a', 'b', 'a', 'c']
list2.remove('a')
print(list2)

#remove the second occurrence of 'a'
list2.remove('a')
print(list2)

Given that elements can occur multiple times in a list, it is useful to be able to determine how many times an element occurs. The count operator can be used to determine how many times a particular element occurs.

#check how many times an element occurs in a list
list3=['a','a','b', 'a', 'b', 'c']
print(list3.count('a'))
print(list3.count('b'))
print(list3.count('c'))

In some games the player may start off with no items in their inventory. To represent this as a list we can use an empty list. An empty list is represented by a pair of square brackets with nothing in between.

#empty list
list4=[]
list4.append('a')
list4.append('b')
print(list4)

Download source code [List operations]

Implementing the inventory

The code developed in part 2 of the tutorial is updated to make use of an inventory system. There are two items that can be added to the inventory – the sword in location 2 and the key in location 3. The inventory is initialised to an empty list.

inventory=[]

Next we update the playLocation2 function so that the sword is added to the inventory after it is located (line 70). To ensure that the inventory variable can be accessed within the function, we need to define inventory as a global variable (line 55).

def playLocation2():
    global inventory
    print("You stand atop a narrow ledge.")
    print("A rickety rope ladder dangles off the edge.")
    print("You see a pile of rubble at the far end of the ledge.")
    print("You can either (c)limb down the rope ladder or (s)earch the rubble.")
    response=input("> ")
    if (response=="c"):
        print("You carefully climb down the rope ladder.")
        location="location1"
    elif (response=="s"):
        print("You edge your way along the ledge, almost slipping a couple of times.")
        print("You search the pile of rubble, move large rocks until you discover a sword.")
        print("The sword is inscribed with runes and shimmers in the sun.")
        print("You carefully strap the sword to your back.")
        location="location2"
        inventory.append("sword")
    else:
        location="location2"
    return location

We also update the playLocation3 function so that the sword can be used to slay the Ogre if it has added to the inventory. Line 91 checks that the player response is attack and the sword is in the inventory. The two conditions are joined using the and operator, which evaluates to true if both of the conditions are true. Line 97 adds the key to the inventory.

def playLocation3():
    global inventory
    print("You reach what looks like a rudimentary camp site.")
    print("You notice a fire pit in the middle of the camp site.")
    print("Scattered around the fire pit are the many bones picked clean of flesh.")
    print("Ominously some of the bones look human like.")
    print("Just as you finish surveying the scene you here a roar.")
    print("Running towards you, wielding a large club is an Ogre.")
    print("You can either (f)lee to the south, (a)ttack the Ogre or try to (t)alk with the Ogre.")
    response=input("> ")
    if (response=="f"):
        print("You run away from the Ogre at full speed")
        print("The Ogre pursues for a while but eventually gives up.")
        print("You survive another day.")
        print("Once you know you are safe you continue your journey southward at a slower pace.")
        location="location1"
    elif (response=="a" and "sword" in inventory):
        print("As the Ogre draws near you draw your sword.")
        print("With one hefty swing of your sword you slay the Ogre.")
        print("You search the body of the Ogre and find a key.")
        print("You take the key and head back towards the clearing with the chest.")
        location="location1"
        inventory.append("key")
    elif (response=="a"):
        print("You fight valiantly with the Ogre.")
        print("You manage to inflict several telling blows against it but it fights on.")
        print("Having dodged several sweeping blows, the Ogre brings its club down upon you with a crash.")
        print("...")
        location="finish"
    elif (response=="t"):
        print("You attempt to make conversation with the Ogre but this only makes it more angry.")
        location="location3"
    else:
        location="location3"
    return location

The playLocation1 function is updated in a similar way to check whether the player has the key in their inventory when they attempt to open the chest.
The full code listing is given as follows:

location="start"
inventory=[]

def playStart():
    print("You are on a quest to find the lost sippy cup.")
    print("The sippy cup is a priceless treasure that grants\nthe user eternal life")
    print("You come to a junction. You can either go (w)est or (e)ast.")
    print("What do you select?")
    response=input("> ")
    if (response=="w"):
        location="location1"
        print("You travel along the path to the west...")
    elif (response=="e"):
        location="location2"
        print("You travel along the path to the east.")
        print("The path leads gradually upwards until you finally reach a ledge.")
    else:
        location="start"
    return location


def playLocation1():
    global inventory
    print("You are in a large clearing.")
    print("In the centre of the clearing is a chest.")
    print("There is a path leading north.")
    print("To the south you can see a cliff face with a rope ladder leading to a ledge.")
    print("You can go (n)orth, (c)limb the ladder or attempt to (o)pen the chest.")
    print("Enter your selection.")
    response=input("> ")
    
    if (response=="o" and "key" in inventory):
        print("You use the key recovered from the Ogre to unlock the chest.")
        print("As you open the lid of the chest a warm glow flows through your body.")
        print("Inside the chest you see the magical sippy cup. ")
        print("As you bring the sippy cup to your mouth and take a sip you feel instantly invigorated.")
        print("You have completed your quest.")
        location="finish"
    elif (response=="o"):
        print("You are unable to open the chest.")
        print("It has a large padlock which cannot be broken.")
        location="location1"
    elif (response=="n"):
        print("You travel for several hours along a winding path.")
        location="location3"
    elif (response=="c"):
        print("You climb the rope ladder which sways dangerously as you make your way up.")
        print("At the top of a ladder you climb up to a ledge.")
        location="location2"
    else:
        location="location1"
    return location

def playLocation2():
    global inventory
    print("You stand atop a narrow ledge.")
    print("A rickety rope ladder dangles off the edge.")
    print("You see a pile of rubble at the far end of the ledge.")
    print("You can either (c)limb down the rope ladder or (s)earch the rubble.")
    response=input("> ")
    if (response=="c"):
        print("You carefully climb down the rope ladder.")
        location="location1"
    elif (response=="s"):
        print("You edge your way along the ledge, almost slipping a couple of times.")
        print("You search the pile of rubble, move large rocks until you discover a sword.")
        print("The sword is inscribed with runes and shimmers in the sun.")
        print("You carefully strap the sword to your back.")
        location="location2"
        inventory.append("sword")
    else:
        location="location2"
    return location

def playLocation3():
    global inventory
    print("You reach what looks like a rudimentary camp site.")
    print("You notice a fire pit in the middle of the camp site.")
    print("Scattered around the fire pit are the many bones picked clean of flesh.")
    print("Ominously some of the bones look human like.")
    print("Just as you finish surveying the scene you here a roar.")
    print("Running towards you, wielding a large club is an Ogre.")
    print("You can either (f)lee to the south, (a)ttack the Ogre or try to (t)alk with the Ogre.")
    response=input("> ")
    if (response=="f"):
        print("You run away from the Ogre at full speed")
        print("The Ogre pursues for a while but eventually gives up.")
        print("You survive another day.")
        print("Once you know you are safe you continue your journey southward at a slower pace.")
        location="location1"
    elif (response=="a" and "sword" in inventory):
        print("As the Ogre draws near you draw your sword.")
        print("With one hefty swing of your sword you slay the Ogre.")
        print("You search the body of the Ogre and find a key.")
        print("You take the key and head back towards the clearing with the chest.")
        location="location1"
        inventory.append("key")
    elif (response=="a"):
        print("You fight valiantly with the Ogre.")
        print("You manage to inflict several telling blows against it but it fights on.")
        print("Having dodged several sweeping blows, the Ogre brings its club down upon you with a crash.")
        print("...")
        location="finish"
    elif (response=="t"):
        print("You attempt to make conversation with the Ogre but this only makes it more angry.")
        location="location3"
    else:
        location="location3"
    return location

    
while (location!="finish"):
    if (location=="start"):
        location=playStart()
    elif (location=="location1"):
        location=playLocation1()
    elif (location=="location2"):
        location=playLocation2()
    elif (location=="location3"):
        location=playLocation3()
    else:
        break

Download source code [Stage 3 code]

Limitations

When we play through the game we notice that when the player returns to an area we are presented with the same options. For example, when returning to location 3 after having already slaying the Ogre the player encounters a new Ogre. To address this limitation we need some way of tracking the events that have occurred within a particular area.

Developing a text-based adventure game (Part 2)

Adding and linking multiple locations

In the first part of the text-based adventure game development tutorial we described how print, input and conditional statements can be used to implement an interactive encounter. We also noted that although nested conditional statements could be used to link multiple encounters, this approach will quickly lead to the development of spaghetti code.

In this tutorial we investigate a solution to developing linked encounters using functions and loops.

Game synopsis

We begin by providing a brief synopsis for our proposed game.

The player quests to retrieve the magical sippy cup, which is believed to grant eternal life whoever has it in their possession. However the sippy cup has been stolen, and
it is the responsibility of our brave adventurer to rescue it. The game consists of three location.

  • Location 1 contains a locked chest. The chest cannot be opened without the key which is not in this location.
  • Location 2 contains a magical sword hidden on a ledge at the top of a steep cliff face.
  • Location 3 contains an evil Ogre who happens to have the key to the chest in his possession. The Ogre can only be slain if the player has found the magical sword.

Game layout

Having come up with an overall synopsis for the game, the next step is to consider the game layout and how the locations connect to each other. This can be done with pencil and paper, or a simple digital tool such as OneNote or Paint.

In the layout design shown below there are three locations in addition to a start and finish location. Directed arcs show the possible transitions between locations; for example the start location links to location 1 and location 2.

The diagram shows the layout for a simple non-linear text based adventure game. The nodes of the diagram represent the game locations, while the edges represent connections between these locations.

Initial layout for a simple non-linear text based adventure game

Location details

Having designed the layout of the adventure, we next need to define the narrative for each location. This should include the contextual information as well as the options available to the player. For example, the narrative for the start location would be as follows.

You are on a quest to retrieve the find the lost sippy cup. The sippy cup is a priceless treasure that grants the user eternal life. You come to a junction. You can either go west or east.

Linking locations

The final step before we can begin code is to define the links between the different locations. We need to provide details of the actions or events that need to occur to move from one location to another.

Shows how locations can be linked with events.

Game layout with linking events

Initial coding step

To code the flowchart shown earlier we firstly add a variable to represent the location that the player is currently in. Line 1 of the code listing below
initialises the location variable to the start location. Lines 20-24 contain a while loop which is run repeatedly until the condition is true.
In this case, the code inside the while loop is repeated until the player is in the finish location. The != operator checks that the first argument is not equal to the second argument. A conditional statement is used to check the current location and call a function corresponding to the location the player is currently in. The else branch at the end uses a break statement to exit the loop. This is used to ensure that the game does not get stuck in an infinite loop.

location="start"

def playStart():
    print("You are on a quest to find the lost sippy cup.")
    print("The sippy cup is a priceless treasure that grants\nthe user eternal life")
    print("You come to a junction. You can either go (w)est or (e)ast.")
    print("What do you select?")
    response=input("> ")
    if (response=="w"):
        location="location1"
        print("You travel along the path to the west...")
    elif (response=="e"):
        location="location2"
        print("You travel along the path to the east.")
        print("The path leads gradually upwards until you finally reach a ledge.")
    else:
        location="start"
    return location

while (location!="finish"):
    if (location=="start"):
        location=playStart()
    else:
        break

Download source code [Stage 1 code]

Defining functions

To avoid monolithic code and to aid with the understandability of the code we employ functions to break up the code. In lines 3-18 a function that handles the starting location is defined. Line 3 of the function declares the name of the function, in this case playStart, together with any inputs that are passed to the function. The first line of a function definition must begin with the def keyword and end with a colon. Input arguments are specified inside of brackets – note that if the function does not have any inputs then an empty of brackets are used. Lines 4-18 contain the body of the function – this is the code that runs when the function is called. Lines 4-7 output the narrative text using print statements. Line 8 prompts the user for their action and assigns the value to the response variable. If the player enters ‘w’, then “location1” is assigned to a local variable used to store the location. Otherwise, if the player enters ‘e’, then “location2” is stored in the local variable. In all other cases the local variable is assigned the “start” location. On line 18 the value stored in the local variable is returned as the result of the function.

Looking at line 22 of the code again, on this line the playStart function is called. Since this function has no inputs we do not pass any values, however we still need to include the empty pair of brackets. The result returned by the function is assigned to the location variable, which will in turn be used in the next iteration of the loop to determine the next function to call.

Coding the other locations

Once we have got the first location coded we follow a similar process to add the additional locations. A function needs to be defined for each of the additional locations and extra cases need to be added in the while loop.

location="start"

def playStart():
    print("You are on a quest to find the lost sippy cup.")
    print("The sippy cup is a priceless treasure that grants\nthe user eternal life")
    print("You come to a junction. You can either go (w)est or (e)ast.")
    print("What do you select?")
    response=input("> ")
    if (response=="w"):
        location="location1"
        print("You travel along the path to the west...")
    elif (response=="e"):
        location="location2"
        print("You travel along the path to the east.")
        print("The path leads gradually upwards until you finally reach a ledge.")
    else:
        location="start"
    return location


def playLocation1():
    print("You are in a large clearing.")
    print("In the centre of the clearing is a chest.")
    print("There is a path leading north.")
    print("To the south you can see a cliff face with a rope ladder leading to a ledge.")
    print("You can go (n)orth, (c)limb the ladder or attempt to (o)pen the chest.")
    print("Enter your selection.")
    response=input("> ")
    if (response=="o"):
        print("You are unable to open the chest.")
        print("It has a large padlock which cannot be broken.")
        location="location1"
    elif (response=="n"):
        print("You travel for several hours along a winding path.")
        location="location3"
    elif (response=="c"):
        print("You climb the rope ladder which sways dangerously as you make your way up.")
        print("At the top of a ladder you climb up to a ledge.")
        location="location2"
    else:
        location="location1"
    return location

def playLocation2():
    print("You stand atop a narrow ledge.")
    print("A rickety rope ladder dangles off the edge.")
    print("You see a pile of rubble at the far end of the ledge.")
    print("You can either (c)limb down the rope ladder or (s)earch the rubble.")
    response=input("> ")
    if (response=="c"):
        print("You carefully climb down the rope ladder.")
        location="location1"
    elif (response=="s"):
        print("You edge your way along the ledge, almost slipping a couple of times.")
        print("You search the pile of rubble, move large rocks until you discover a sword.")
        print("The sword is inscribed with runes and shimmers in the sun.")
        print("You carefully strap the sword to your back.")
        location="location2"
    else:
        location="location2"
    return location

def playLocation3():
    print("You reach what looks like a rudimentary camp site.")
    print("You notice a fire pit in the middle of the camp site.")
    print("Scattered around the fire pit are the many bones picked clean of flesh.")
    print("Ominously some of the bones look human like.")
    print("Just as you finish surveying the scene you here a roar.")
    print("Running towards you, wielding a large club is an Ogre.")
    print("You can either (f)lee to the south, (a)ttack the Ogre or try to (t)alk with the Ogre.")
    response=input("> ")
    if (response=="f"):
        print("You run away from the Ogre at full speed")
        print("The Ogre pursues for a while but eventually gives up.")
        print("You survive another day.")
        print("Once you know you are safe you continue your journey southward at a slower pace.")
        location="location1"
    elif (response=="a"):
        print("You fight valiantly with the Ogre.")
        print("You manage to inflict several telling blows against it but it fights on.")
        print("Having dodged several sweeping blows, the Ogre brings its club down upon you with a crash.")
        print("...")
        location="finish"
    elif (response=="t"):
        print("You attempt to make conversation with the Ogre but this only makes it more angry.")
        location="location3"
    else:
        location="location3"
    return location

    
while (location!="finish"):
    if (location=="start"):
        location=playStart()
    elif (location=="location1"):
        location=playLocation1()
    elif (location=="location2"):
        location=playLocation2()
    elif (location=="location3"):
        location=playLocation3()
    else:
        break

Download source code [Stage 2 code]

Limitations

If you download and run the code you may notice that collecting the sword in location 2 still does not allow you to kill the Ogre. We will address this issue in the next tutorial using a simple inventory solution.

Developing a text-based adventure in Python (Part 1)

Getting started with basic commands

In this series we will develop a text-based adventure game using the Python programming language. Although various development environments exist that can be used to help design such games (e.g. Twine and ADRIFT) we will strip it down to the bare bones, relying only on the basic Python IDLE programming environment for programming and pencil and paper for design.

It is assumed that you have already setup Python with IDLE and are familiar with the basics of creating, saving and running a new program. Download an appropriate version of Python if you do not have it installed already.

Print and input statements

We begin by using print and input statements to tell part of the story to the player and to get their action. This is shown in the code snippet below.

print("You have reached a cross road. You can go north,\nwest or east, or return south from where you came.")
print("Enter 'n', 's', 'e' or 'w'")
direction=input("> ")

Line 1 of the code uses a print statement to provide contextual (narrative) information to the player. Note that the text within the print statement must be enclosed in quotes.
In line 2 the player options are presented using a print statement.
An input statement is used in line 3 of the code to get the responses from the player. The prompt for the input statement is a ‘>’ symbol followed by a space. The response entered by the player is assigned to a variable called direction.

Gotchas

  1. Make sure you the text used in print statements are enclosed in a pair of quotes.
  2. An open bracket, ‘(‘, must be placed immediately after the print and input keywords. A matching closed bracket, ‘)’ must be placed at the end of the the statement.
  3. Remember to use a backslash, not a forward slash, for special commands like the newline command \n.
  4. When assigning a value to a variable, as done on line 3, use a single = symbol.

Conditional statements

The next step in the development is to process the player’s response.
The code shown below takes the player’s response and determines an appropriate course of action using a conditional statement.

if (direction=="n" or direction=="N"):
    print("You meet a Bugbear")
elif (direction=="e" or direction=="E"):
    print("You discover a treasure chest. It is locked!!")
elif (direction=="w" or direction=="W"):
    print("You have come a dead end.")
elif (direction=="s" or direction=="S"):
    print("Running away are you? You big chicken!")
else:
    print("This is not an option")

Lines 4 and 5 represent the first case of the conditional statement. It tests whether the player inputted the direction ‘n’ or ‘N’ to move north. If the player did
enter this direction then the code uses a print statement to indicate that they have encountered a Bugbear. Lines 6-11 of the code handle the three other directions that the player may have selected. To do this elif statements are used, which is a shorthand for else if. The elif statements include a test condition that evaluates to either true or false – the code on the line following the condition is only executed when the condition is true. Lines 12 and 13 of the code handle all other inputs from the user. This is done using an else statement, which does not include condition since it covers all remaining cases not covered by the previous conditions.

Gotchas

There are several common mistakes to try avoid when using conditional statements:

  1. When testing equality in conditions, make sure you use double equal symbols, ==.
  2. A colon must be placed at the end of an if or elif condition.
  3. The statements that follow each of the if, elif and else lines of code must be indented by a full tab.
  4. You must not include a condition after the else keyword.

Nested if statements

The code shown above implements one step in the text adventure – the user is presented with a narrative, they select an option, a brief description of what they observe is given, then the game ends. This game is clearly not going to engage the player – the game needs to continue until some end resolution is achieved.

Consider the encounter with Bugbear that occurs when the player opts to move north. When this encounter occurs we want to again present the player with some options. One way to do this in code is to use a nested conditional statement, i.e. placing an additional conditional statement inside of the original conditional statement. This is shown in the code below where a nested conditional statement is used to handle the encounter with the Bugbear.

print("You have reached a cross road. You can go north,\nwest or east, or return south from where you came.")
print("Enter 'n', 's', 'e' or 'w'")
direction=input("> ")

if (direction=="n" or direction=="N"):
    print("You meet a Bugbear")
    print("You have the following options")
    print("[A]ttack the Bugbear")
    print("[T]alk to the Bugbear")
    print("[R]un away from the Bugbear")
    response=input("> ")
    if (response=="A" or response=="a"):
        print("Bad move - the Bugbear is too strong for you.")
        print("You are badly wounded. This is the end of your adventure.")
    elif (response=="T" or response=="t"):
        print("The Bugbear is very wise.")
        print("He imparts great wisdom upon you.")
        print("Your intelligence is increased.")
    elif (response=="R" or response=="r"):
        print("You manage to escape the Bugbear.")
        print("You have returned to the crossroad")
elif (direction=="e" or direction=="E"):
    print("You discover a treasure chest. It is locked!!")
elif (direction=="w" or direction=="W"):
    print("You have come a dead end.")
elif (direction=="s" or direction=="S"):
    print("Running away are you? You big chicken!")
else:
    print("This is not an option")

Download source code [conditionals.py].

Lines 6-21 are the updated portion of the code. Additional print statements are added to present options to the player. In this case the options are single word commands with the key letter highlighted, indicating the command that the player would need to enter. Line 11 uses an input statement to get the player’s response and store it in a variable. Lines 12-21 contain a conditional statement that selects an appropriate action based on the response given by the player. Note the indentation of commands used in the nested conditional statements. Indentation is critical in Python – it is used to determine where blocks of code start and end.

Limitations

Using nested conditional statements works in this case, but quickly becomes very messy, resulting in what is referred to as spaghetti code. Furthermore, if we want to be able to return to areas/encounters that have already been visited then this code solution will not work at all.